Search Our Database
LBaaS: How to launch a Layer 4 (TCP) Load Balancer
IP ServerOne now offers cloud-based Load Balancer as a Service (LBaaS) in Malaysia, Singapore, and Hong Kong.
You can use LBaaS to improve your app’s performance and availability. Choose between Layer 4 (TCP) or Layer 7 (HTTP/HTTPS) load balancers that match your app’s needs. For guidance on choosing the right load balancer, visit our website here.
Content
| 1 | Overview |
| 2 | Prerequisite |
| 3 | Instructions (Step 1 to 8) |
| 4 | To modify your TCP load balancer’s settings |
| 5 | Tips:
Understanding Port to Listen Understanding Load Balancer Algorithms |
Overview
This tutorial will guide through launching your TCP Load Balancer via the Customer Portal.
Prerequisite
- Register and log in to your Customer Portal account here.
- Guide to top-up cloud credit for load balancer deployment.
Instructions
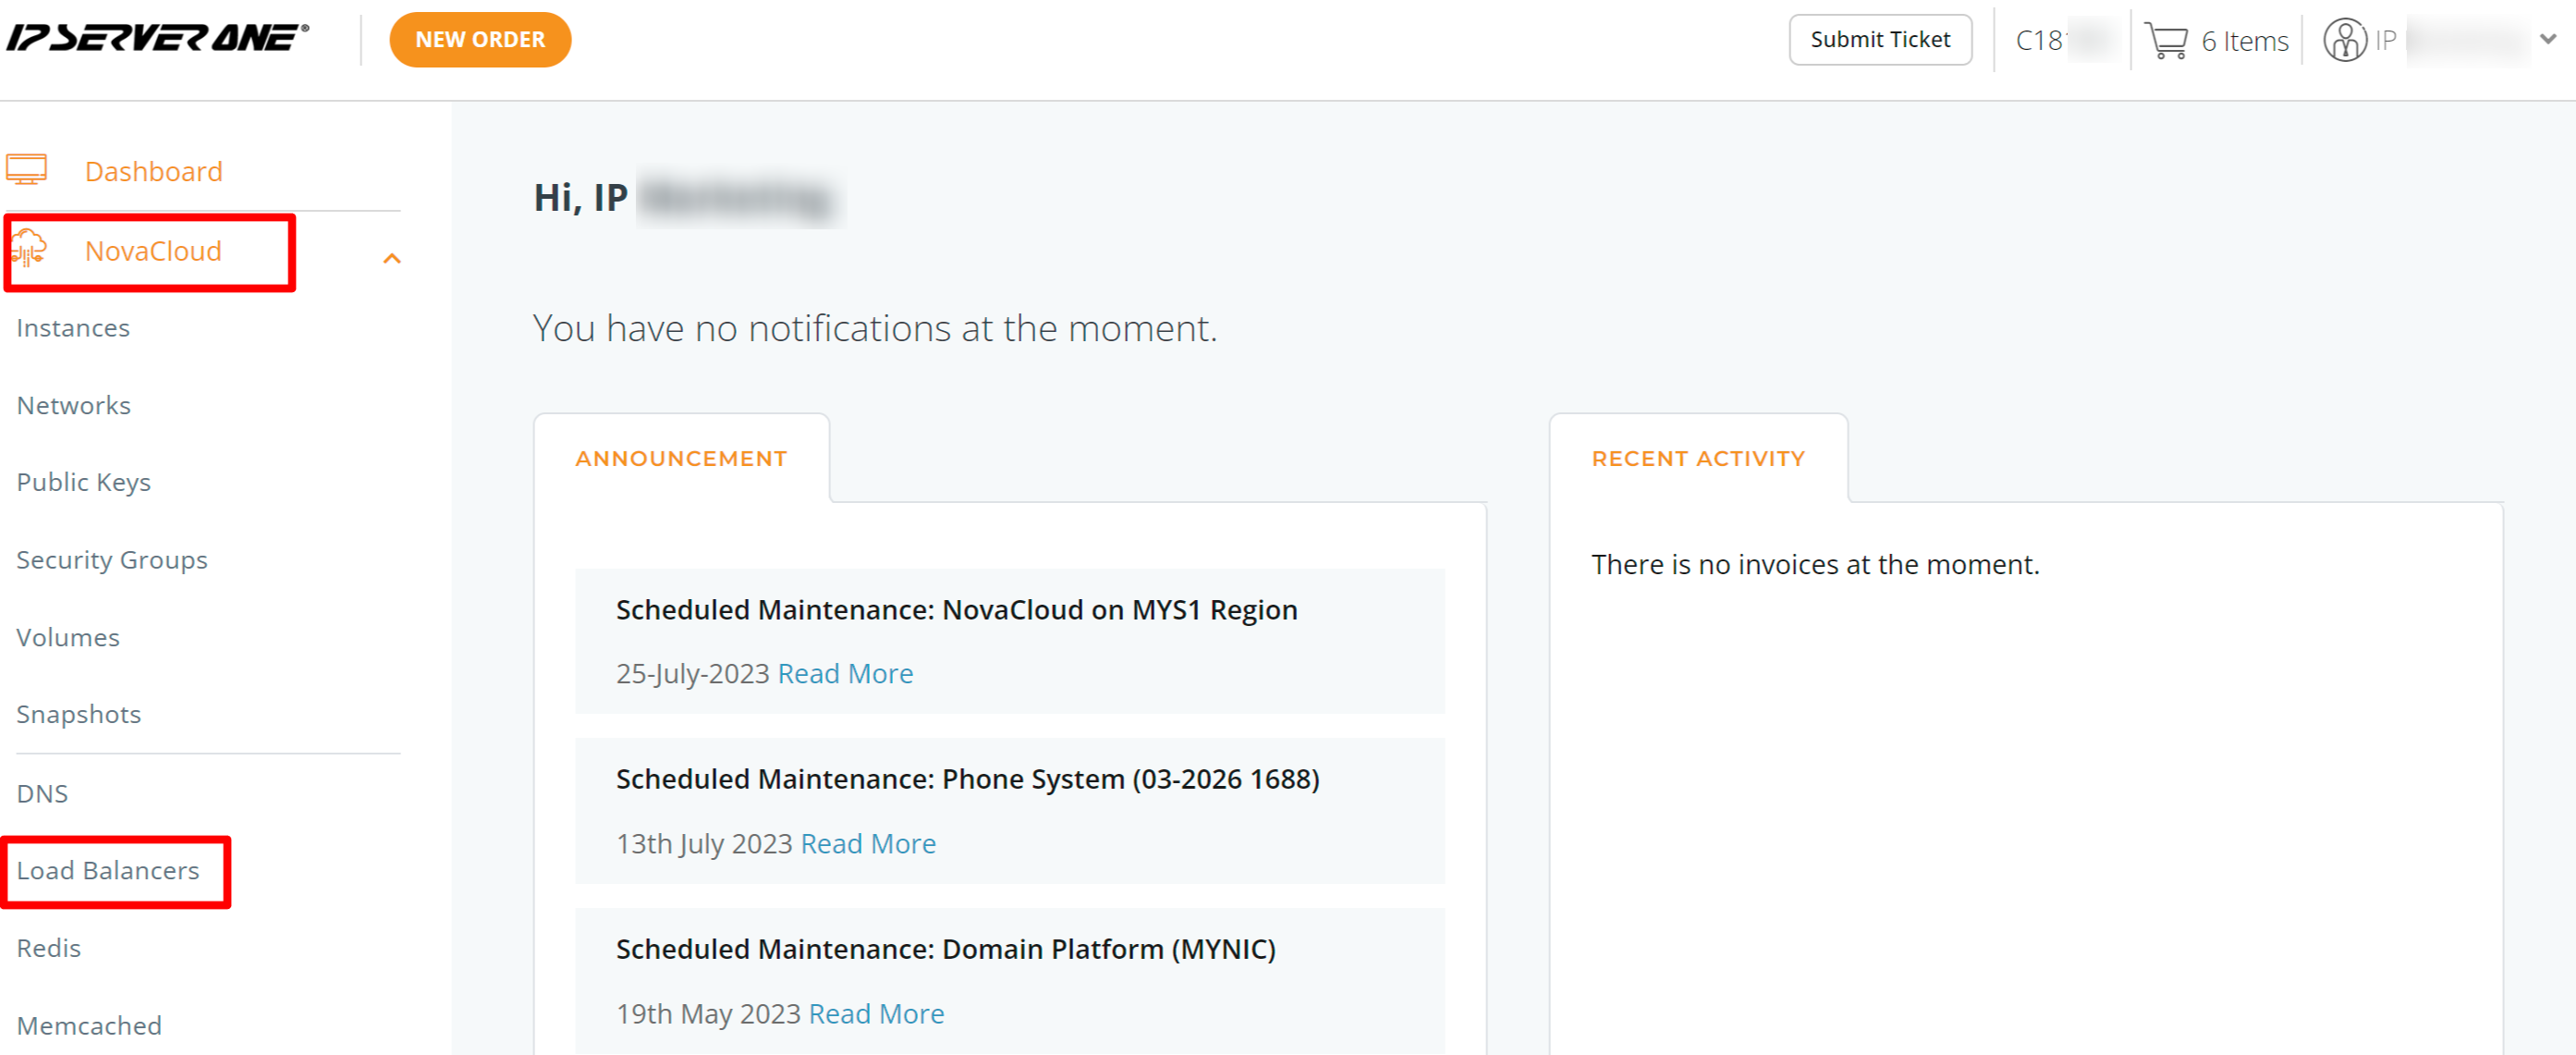
Step 1: Once logged in, click on NovaCloud and dropdown to Load Balancers.
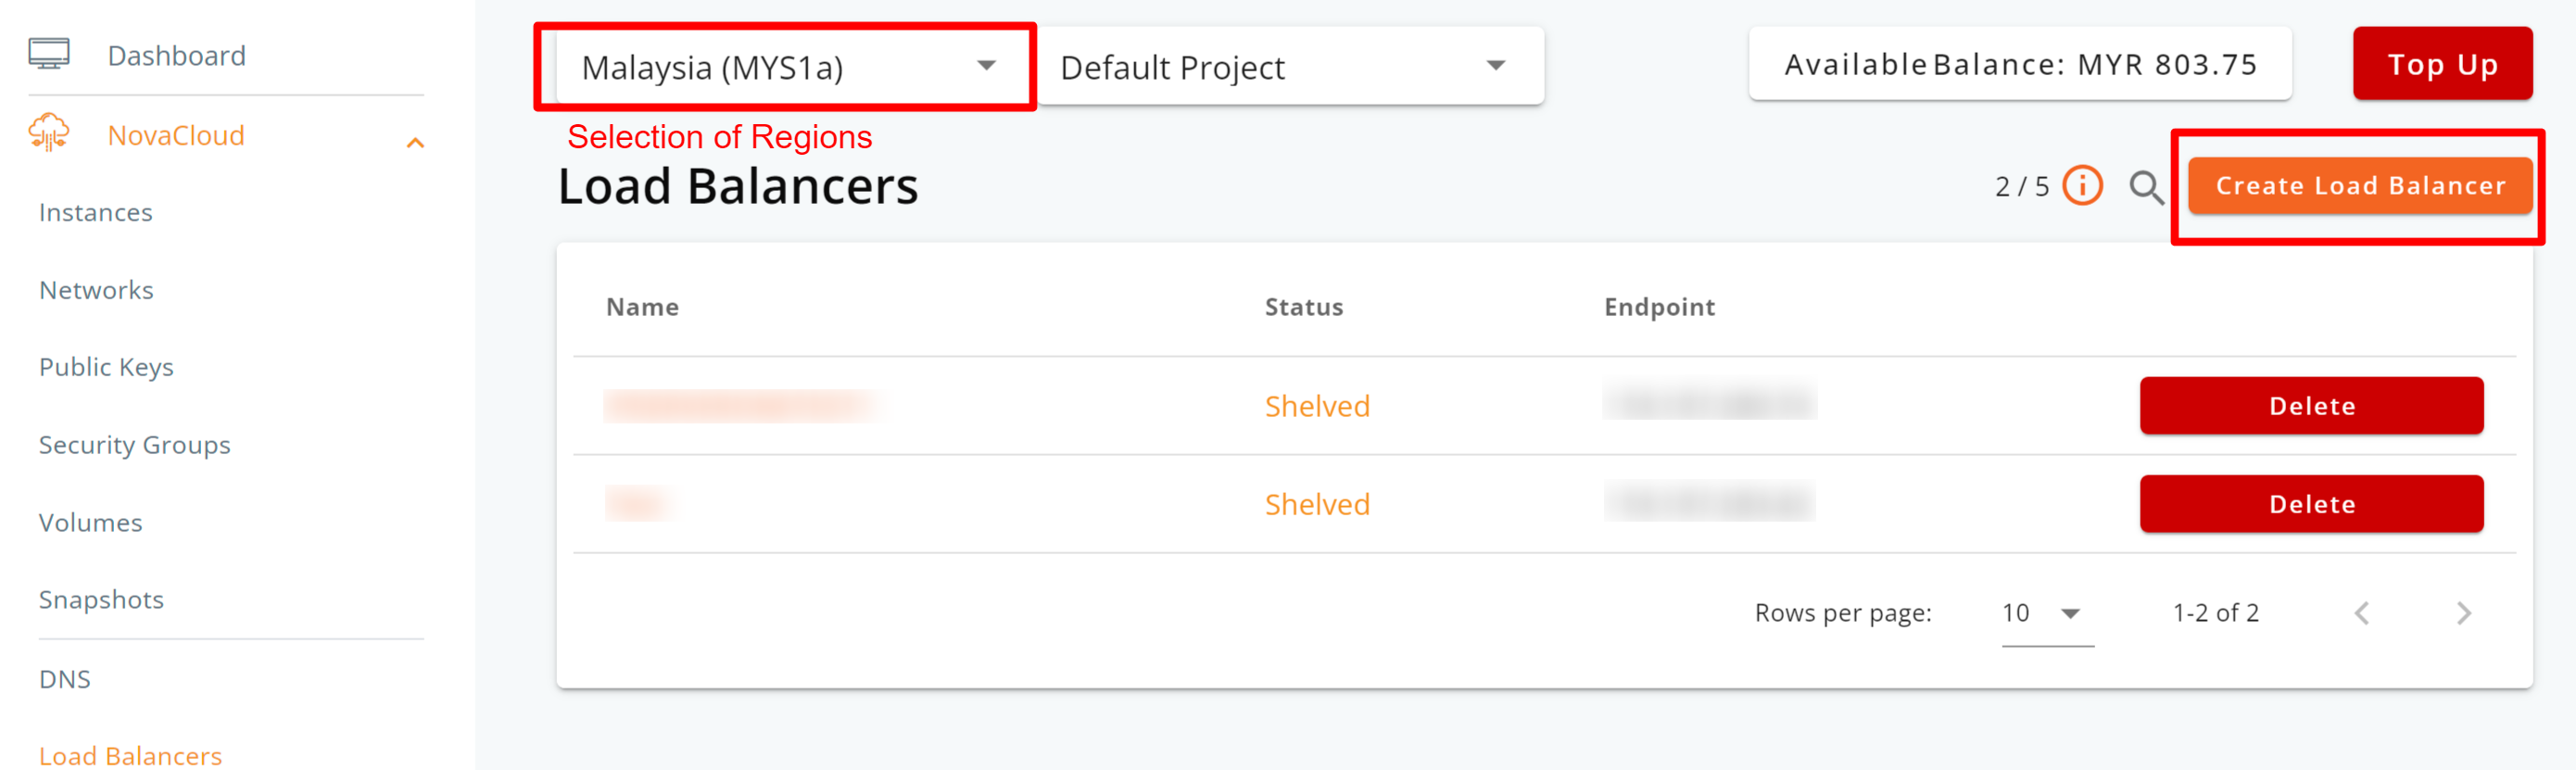
Step 2: Choose your desired deployment region (Malaysia, Singapore, or Hong Kong), and then click the Create Load Balancer button.
Step 3: Choose to deploy your load balancer from either Basic Creation or Advanced Creation.
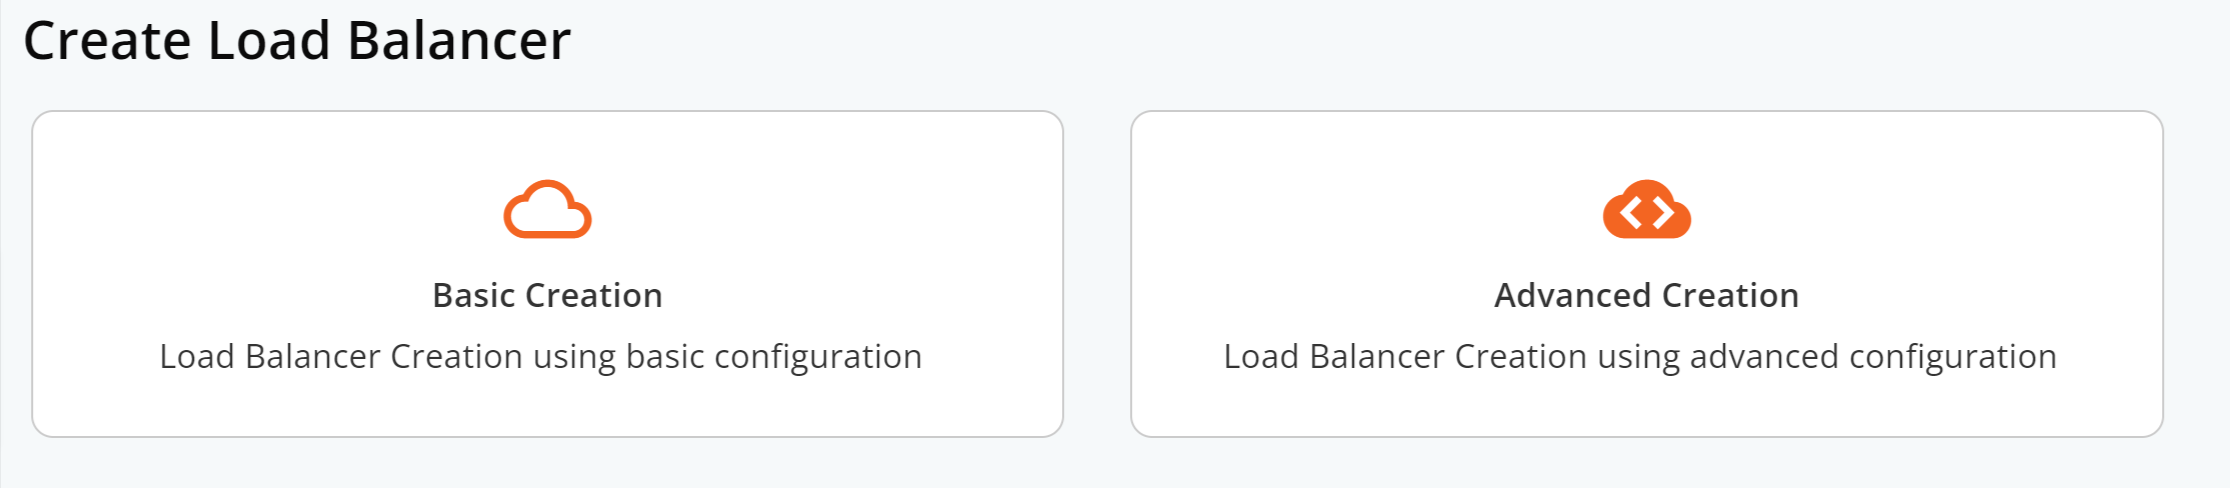
The key difference is:
- Basic Creation makes deploying a TCP load balancer easy. Just specify the traffic type and add target servers with their IP addresses and ports.
- Advanced Creation offers more detailed configurations, including ports and backends, from the start.
No need to worry, though. With Basic Creation, you can still make detailed changes after the load balancer is deployed.
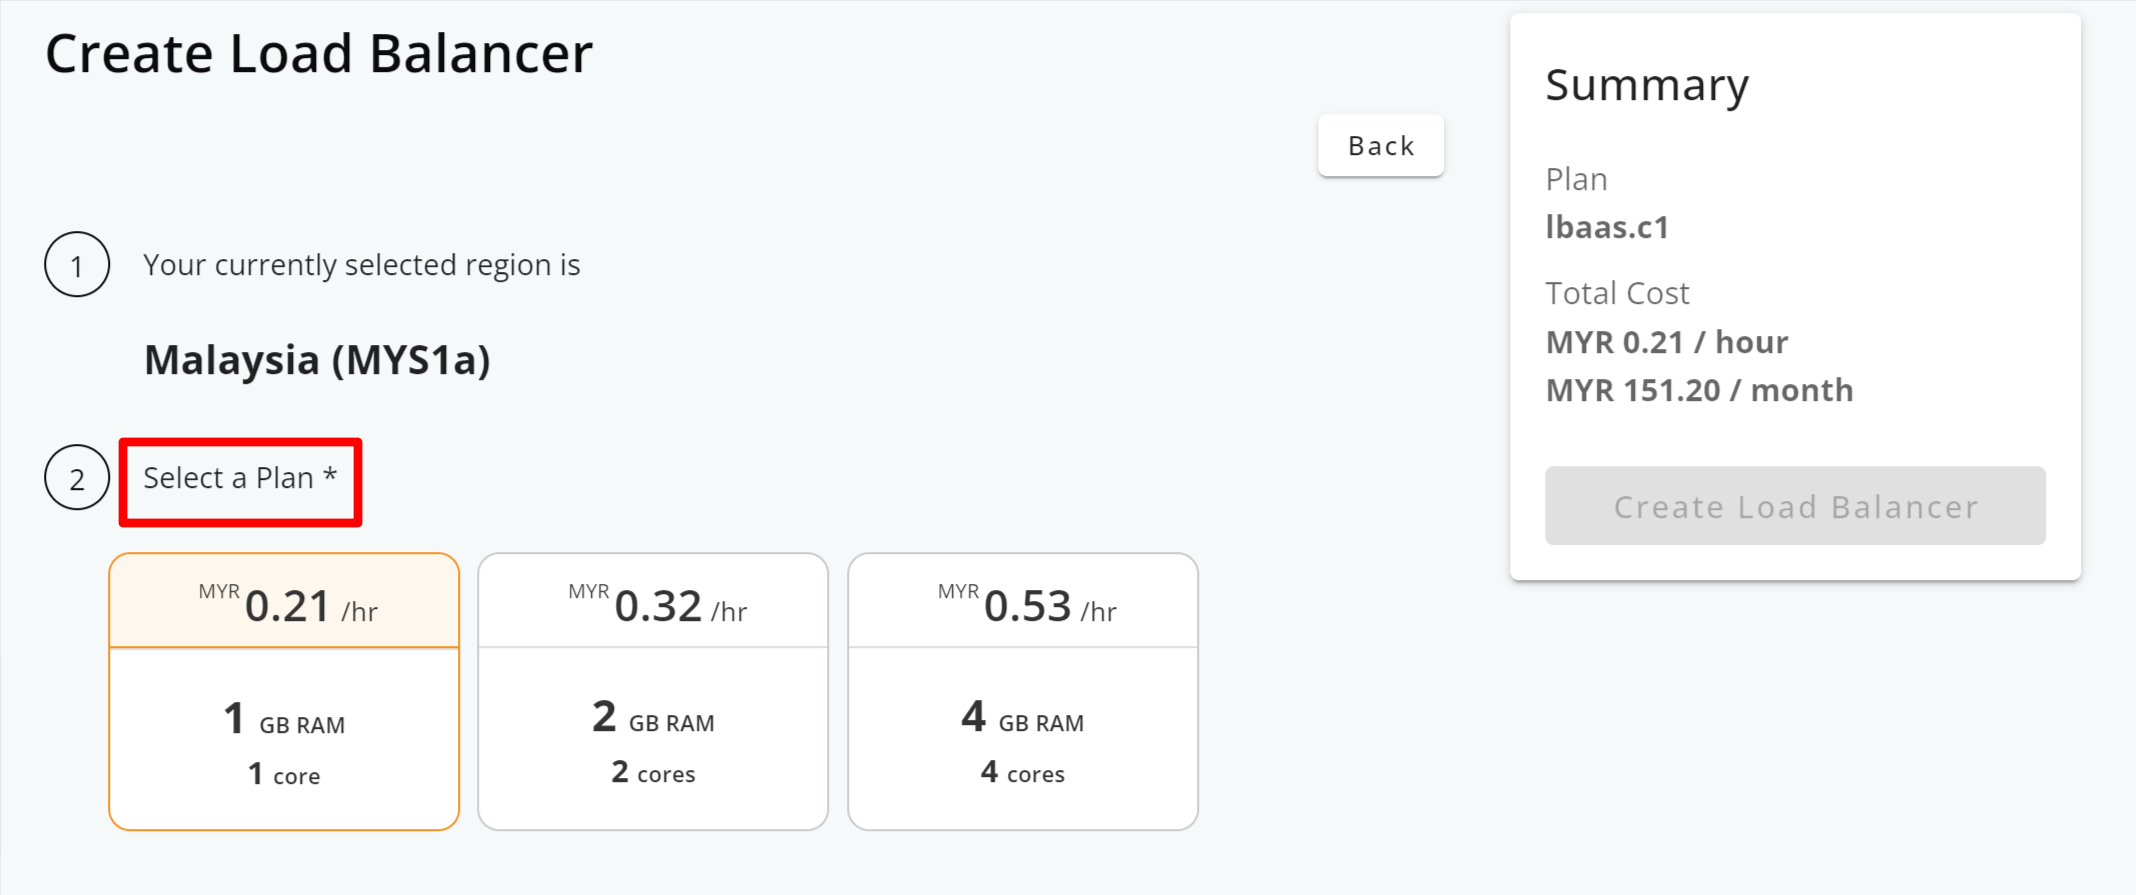
Step 4: Select your load balancer plan.
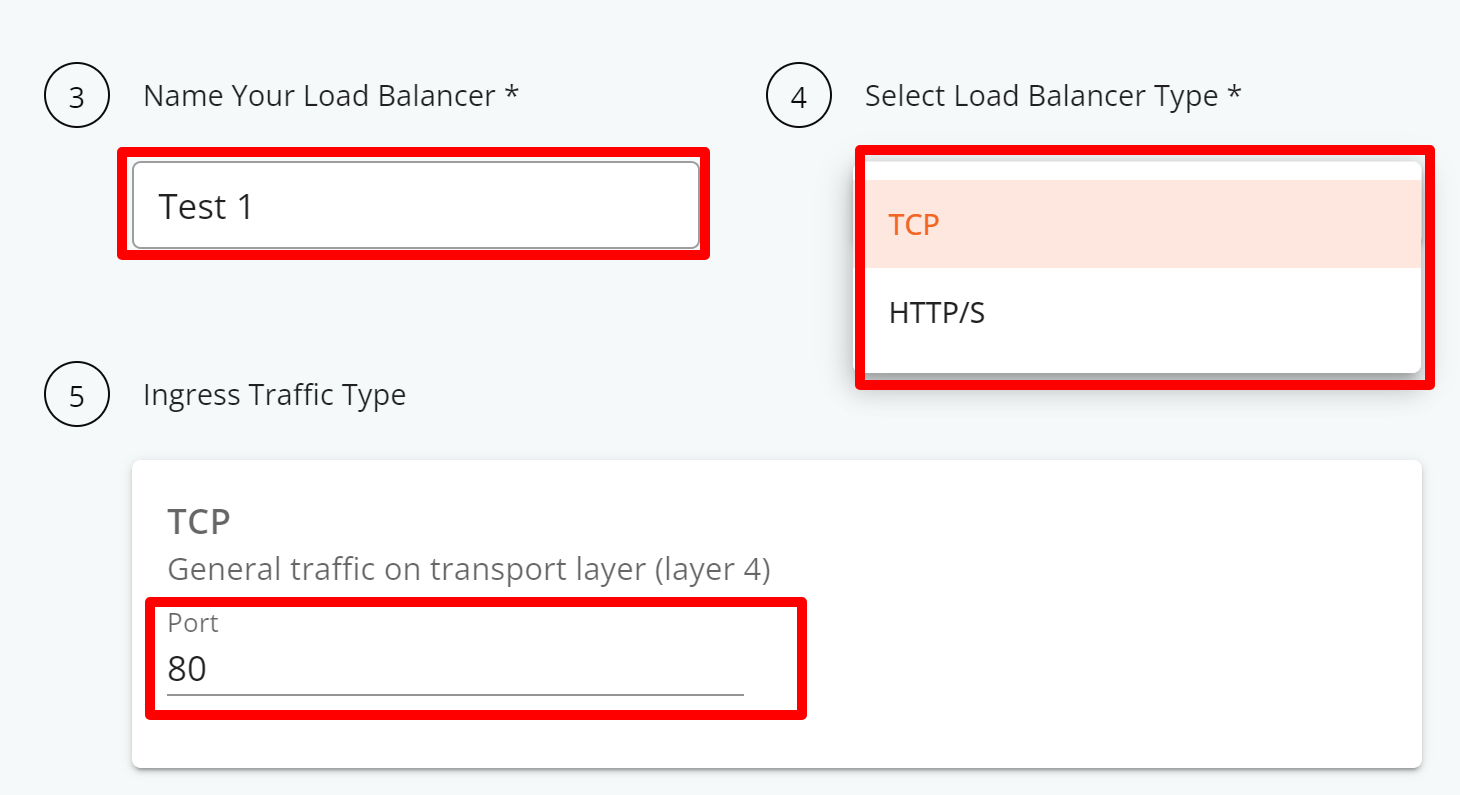
Step 5: Provide a name for your load balancer, select the load balancer type (Network or Application layer for TCP or HTTP/S), and enter your preferred port number.
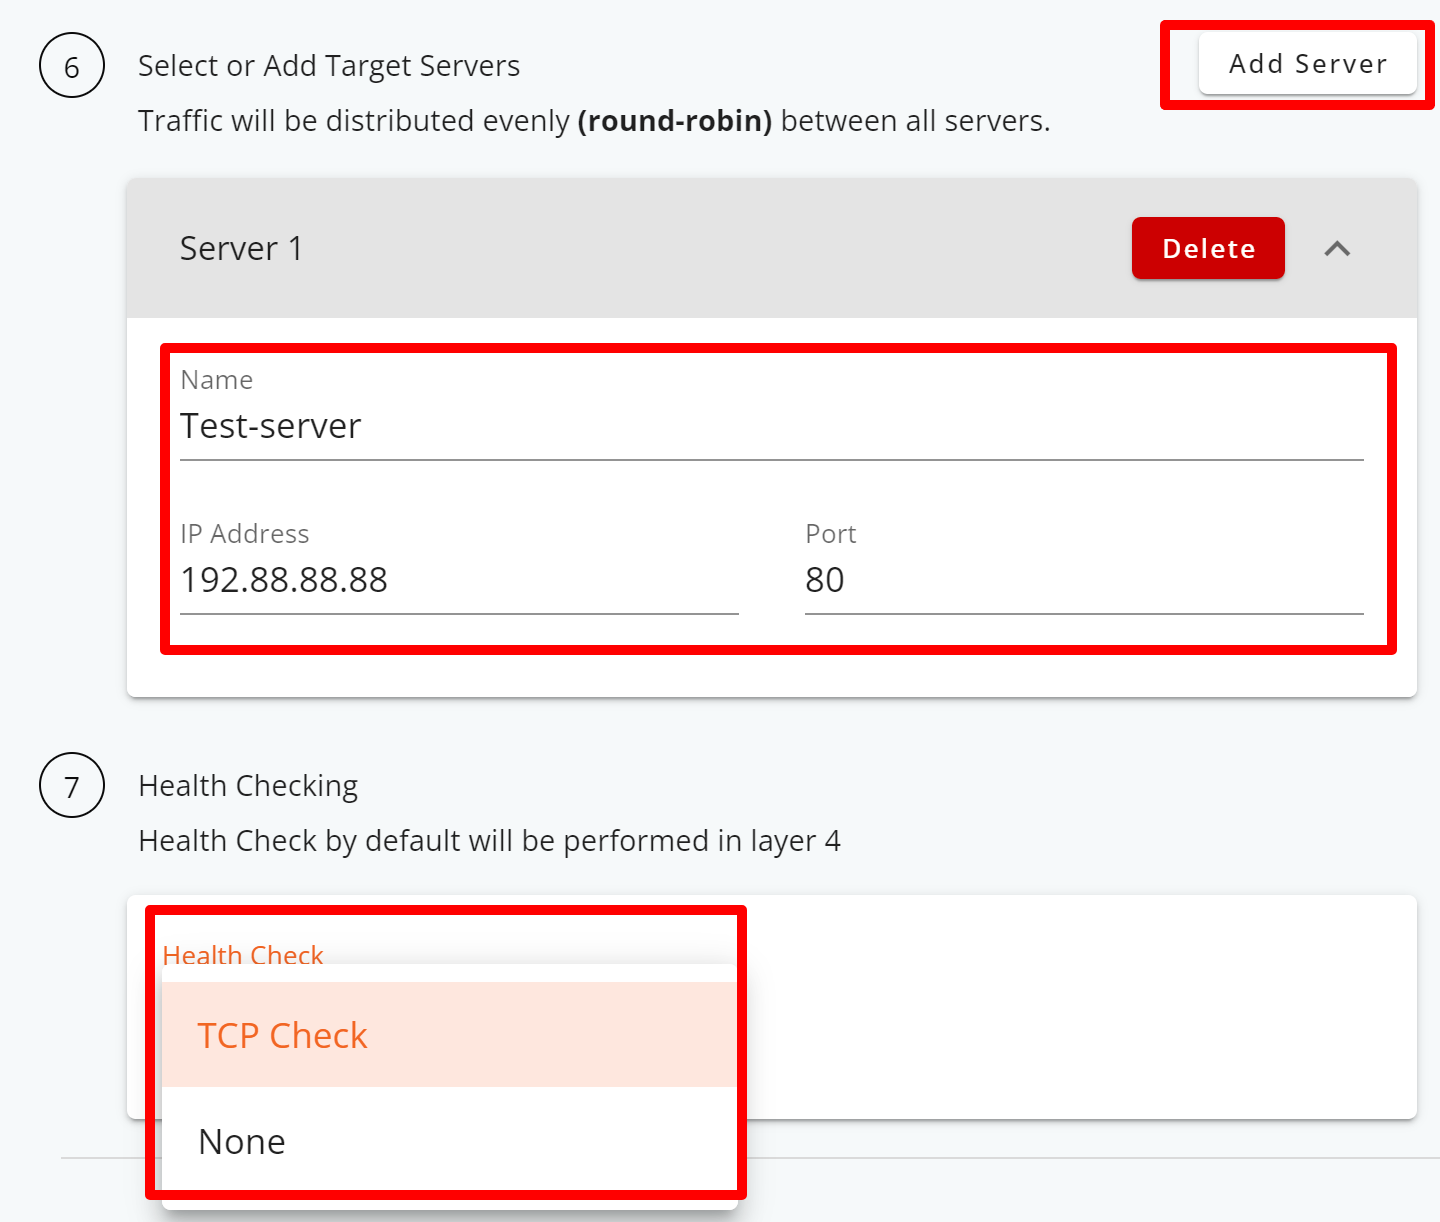
Step 6: Configuring the TCP Load Balancer
- Provide a name for your server.
- Enter the server’s IP address and port number.
- Select TCP Check to enable both active and passive health checking for your server, ensuring that traffic is directed to servers that are healthy and responsive.
**A TCP health check is to check if the server is working properly by sending a small test message to a server. If the server responds promptly, it is considered healthy and operational. If there is no response, it indicates a potential issue, helping ensure the reliability of servers for handling network traffic.
- Optionally, you can add multiple backend servers by clicking the Add Server button.
Step 7: Clicking on the Create Load Balancer button triggers the system to start provisioning the load balancer server, indicated by the Creating status.

Step 8: After the load balancer has been provisioned, its status will change to Active.
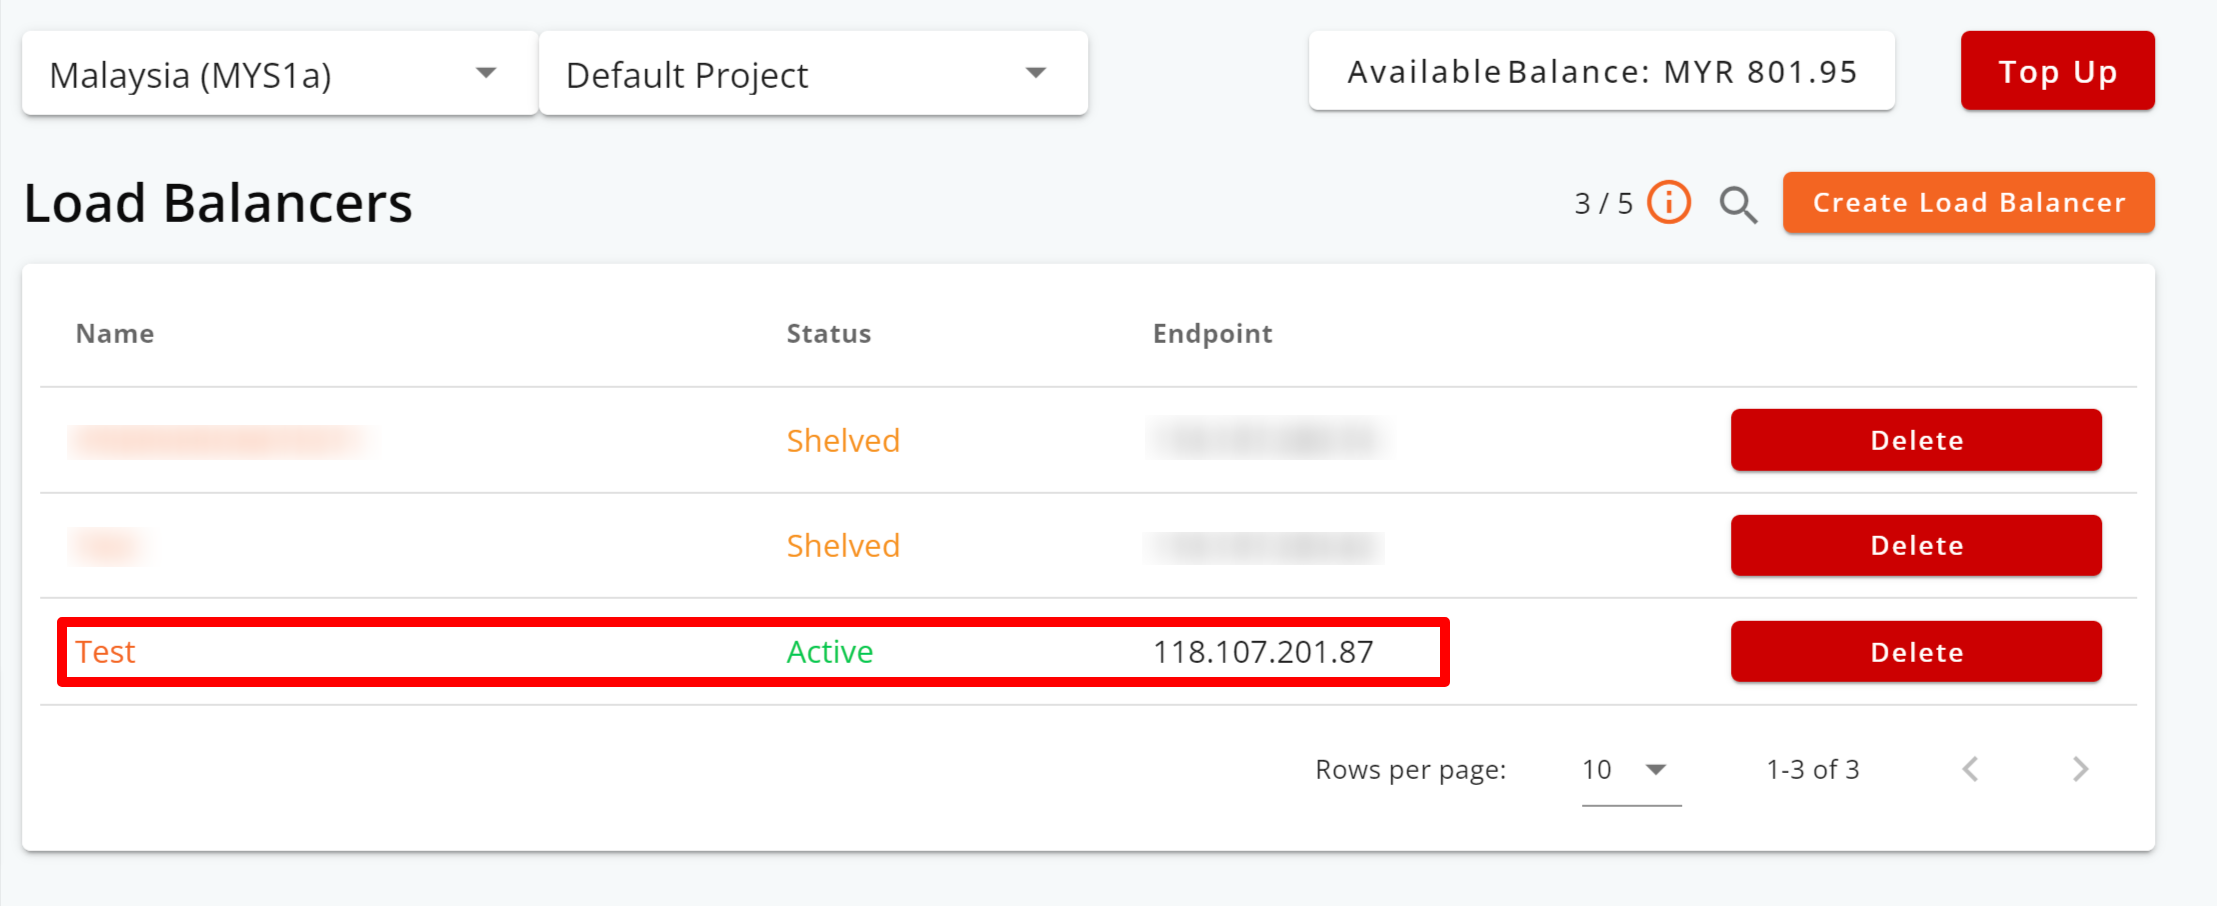
– Step End
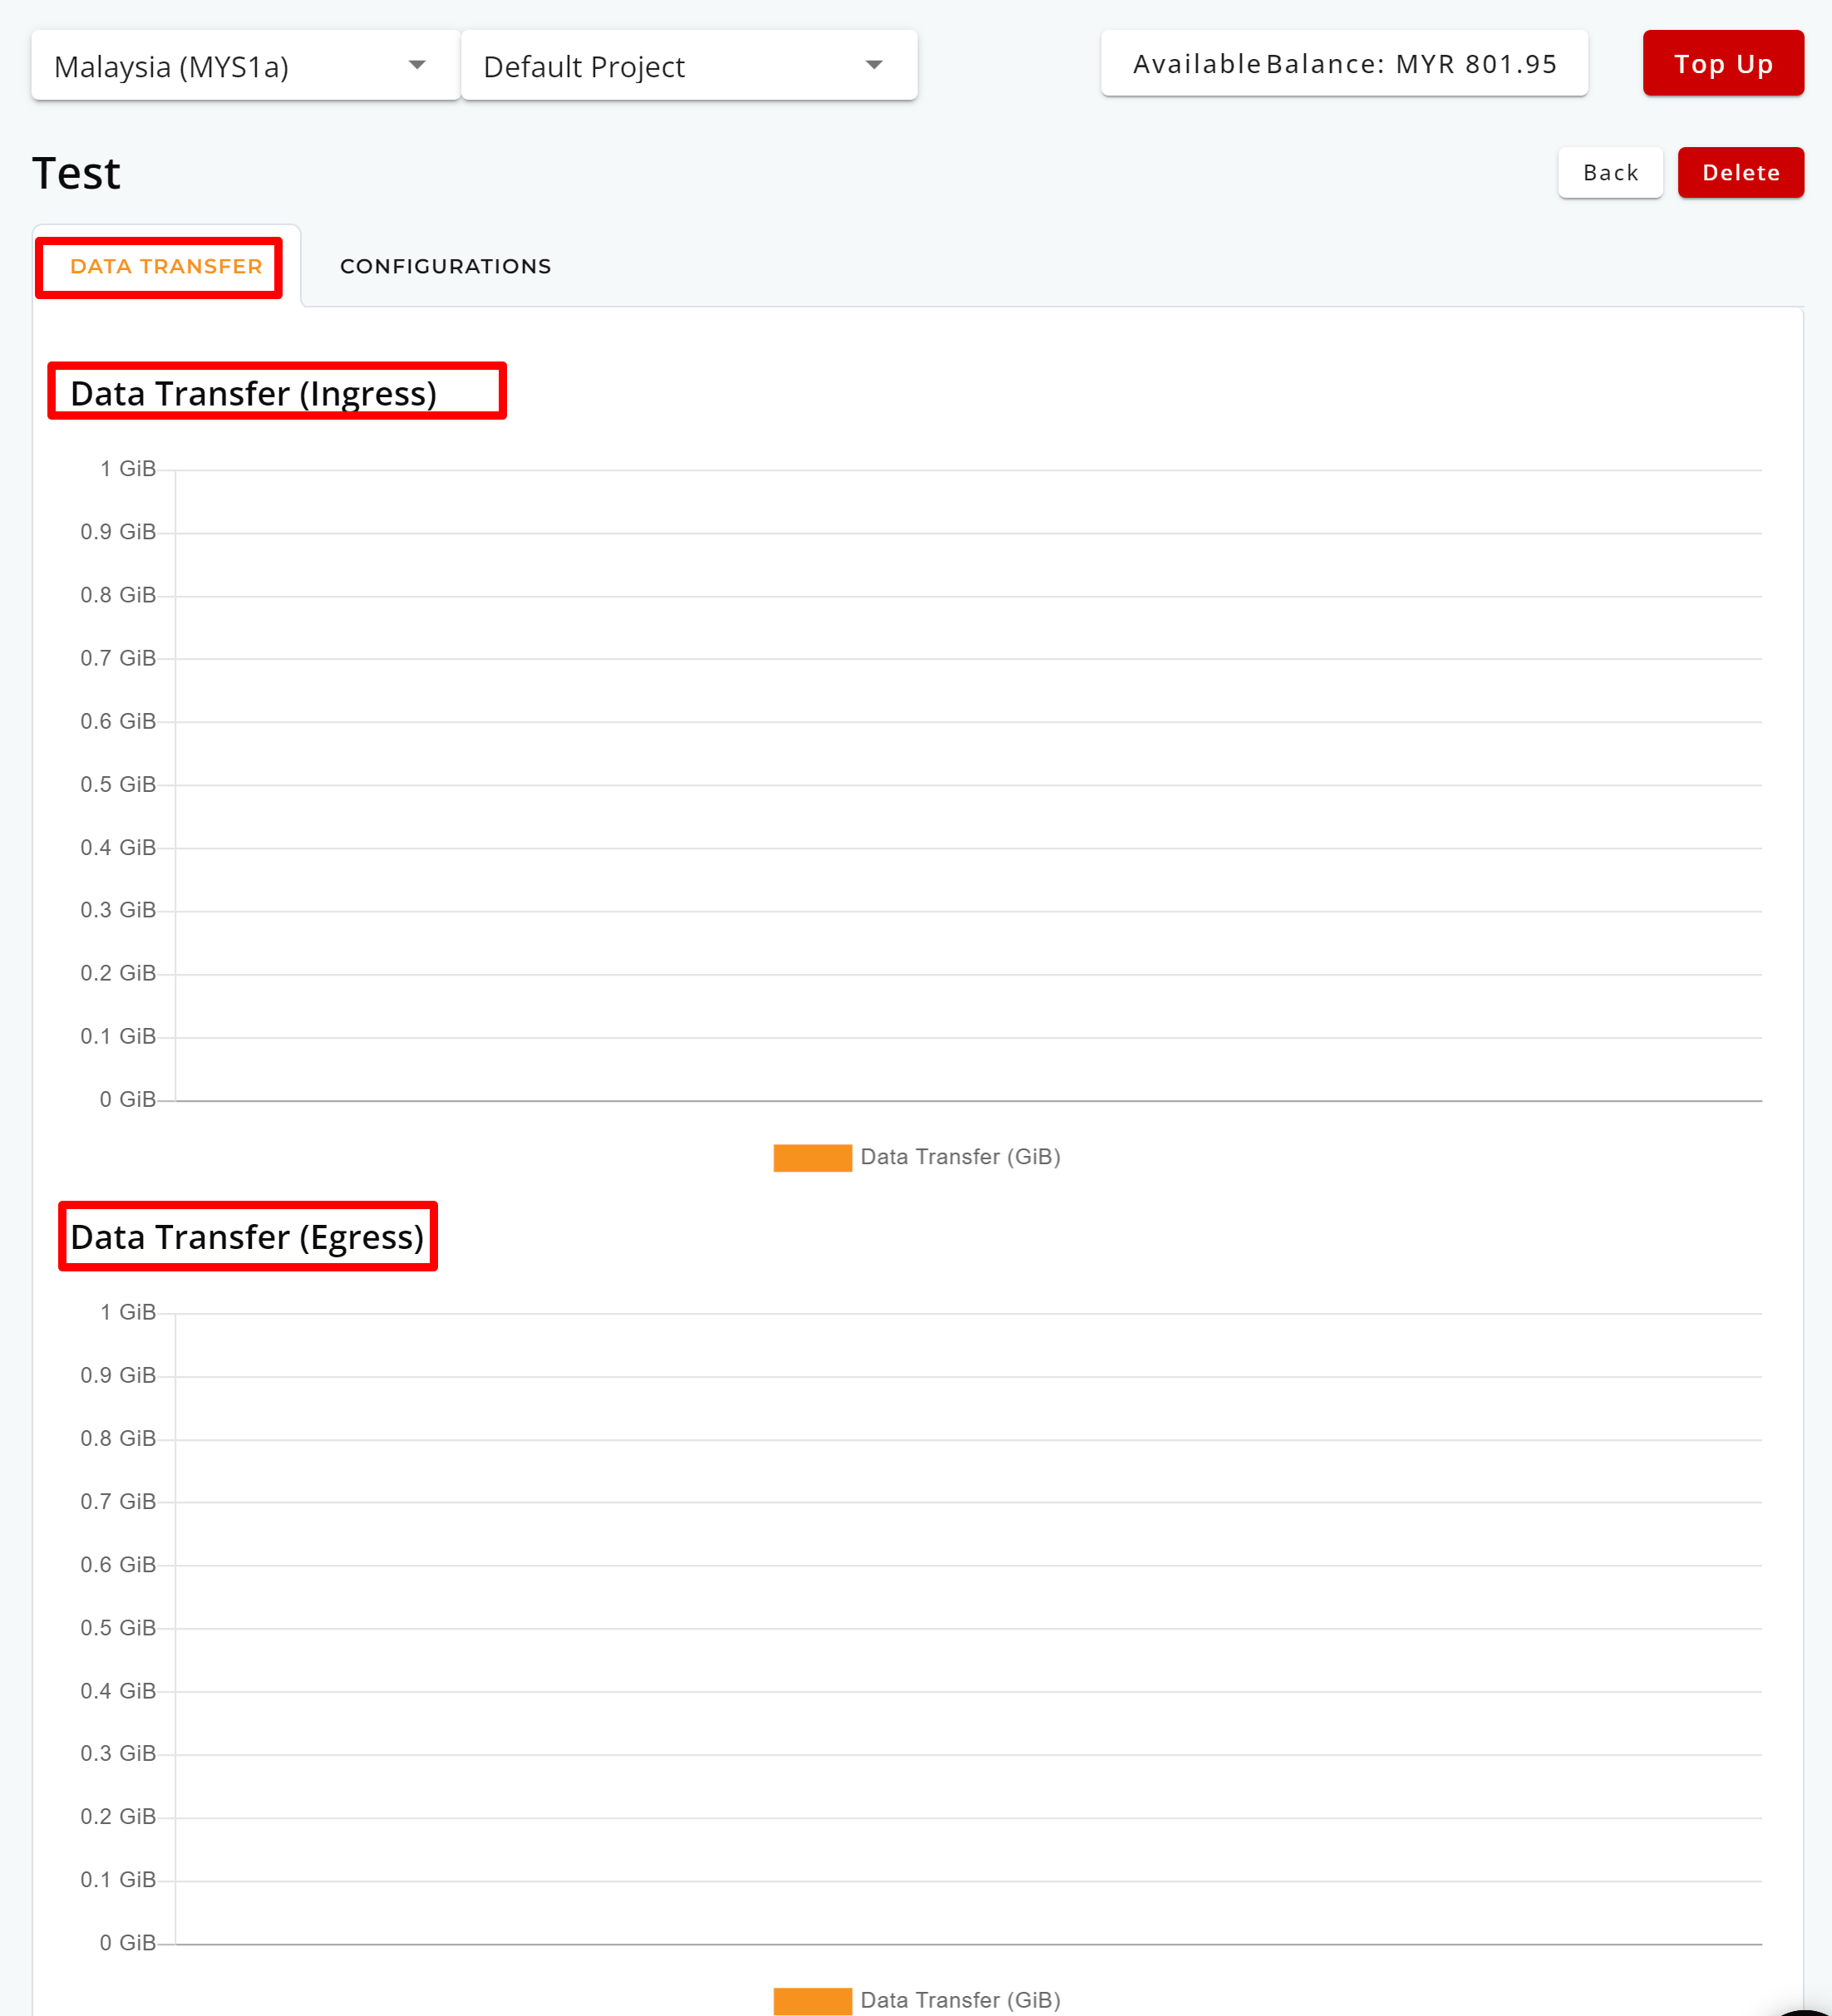
Note: To monitor data transfer or make configuration adjustments, or adding backend servers, simply click on your load balancer’s name.
To modify your TCP load balancer’s settings
You can make modifications to the following:
- Port Configuration
- Health Checks
- Backends
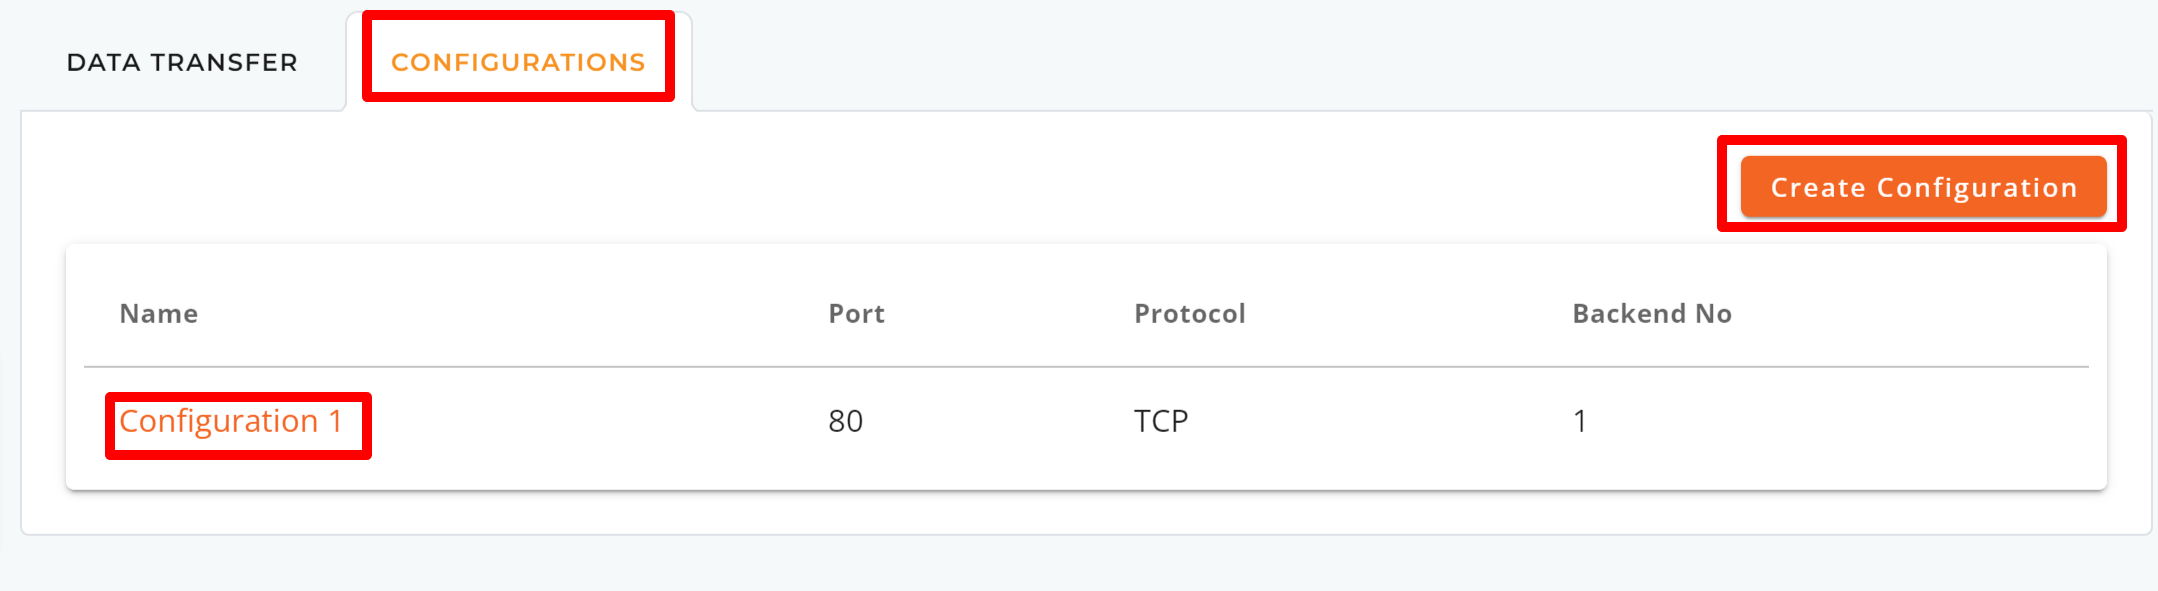
Step 1: Navigate to the CONFIGURATIONS tab and select the configuration you wish to modify by clicking its name.
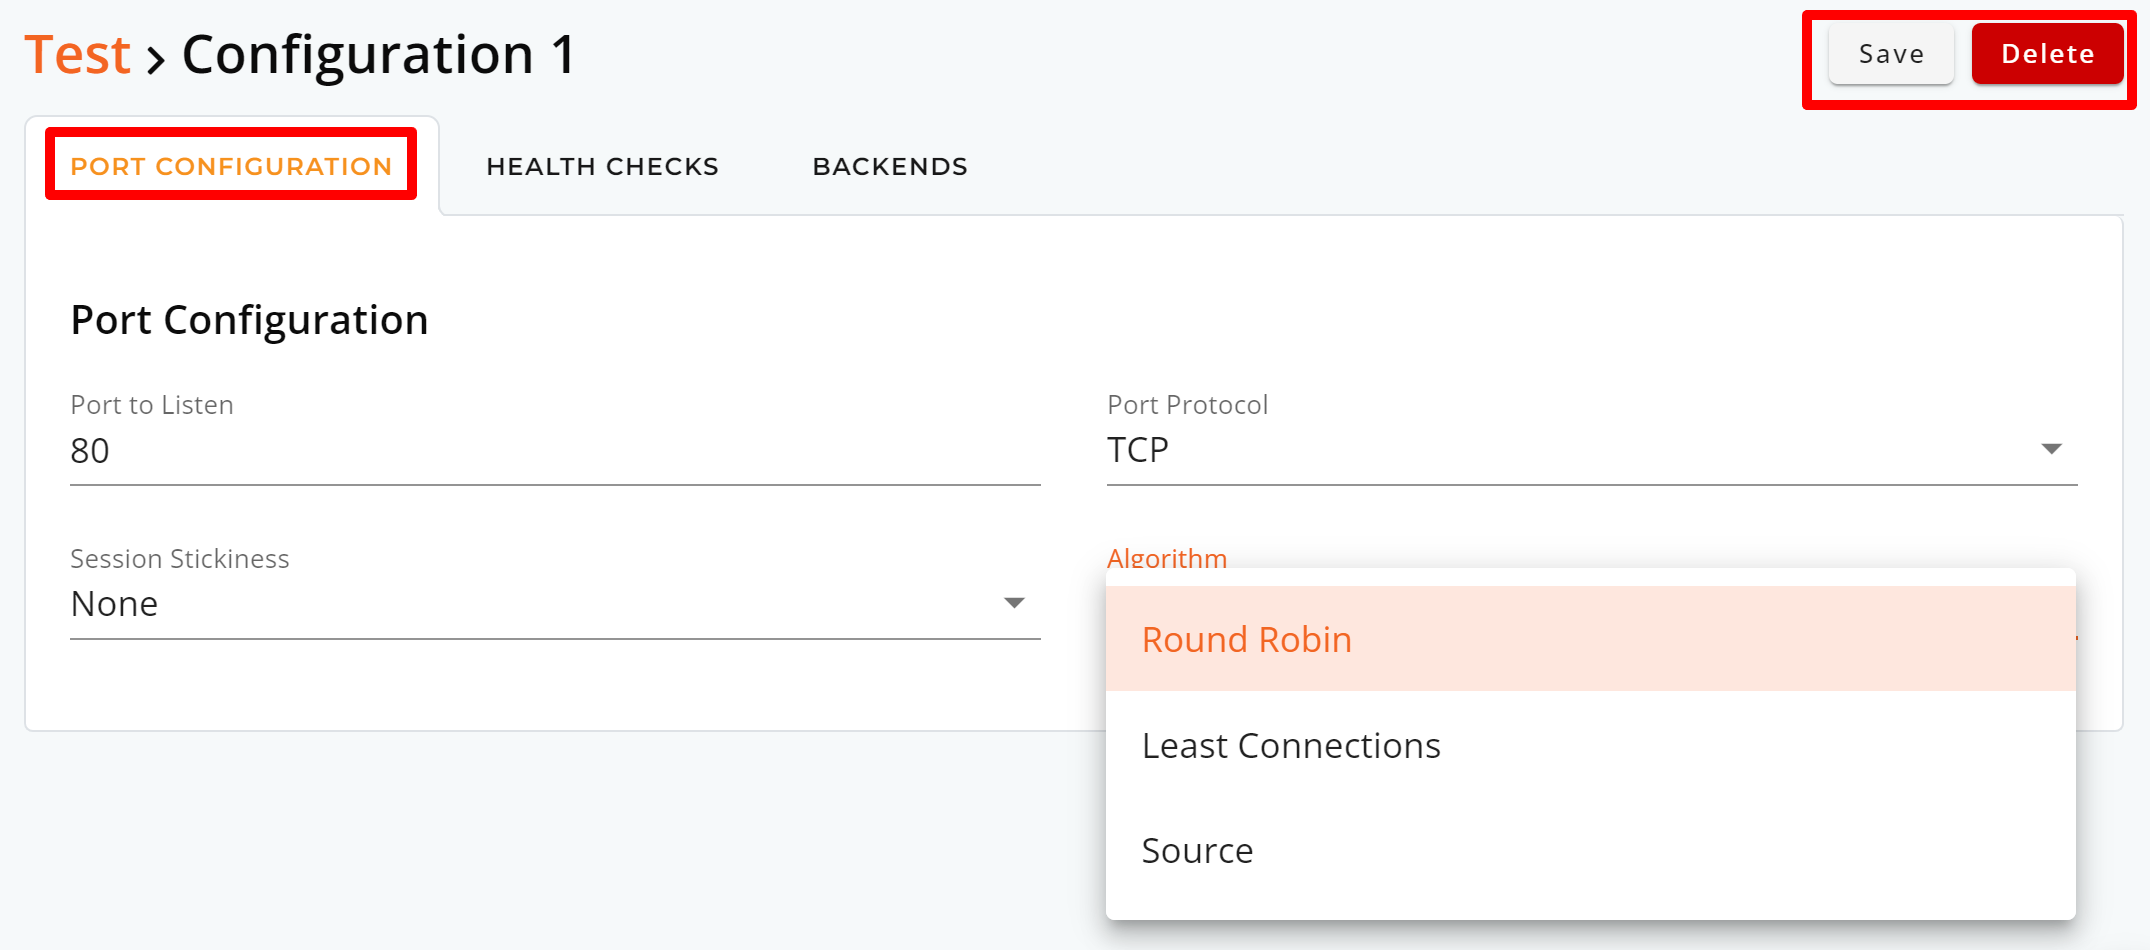
Step 2: Port Configuration
For TCP load balancers, usually session stickiness is not applicable. You can make changes to the Port to Listen and Algorithm you prefer.
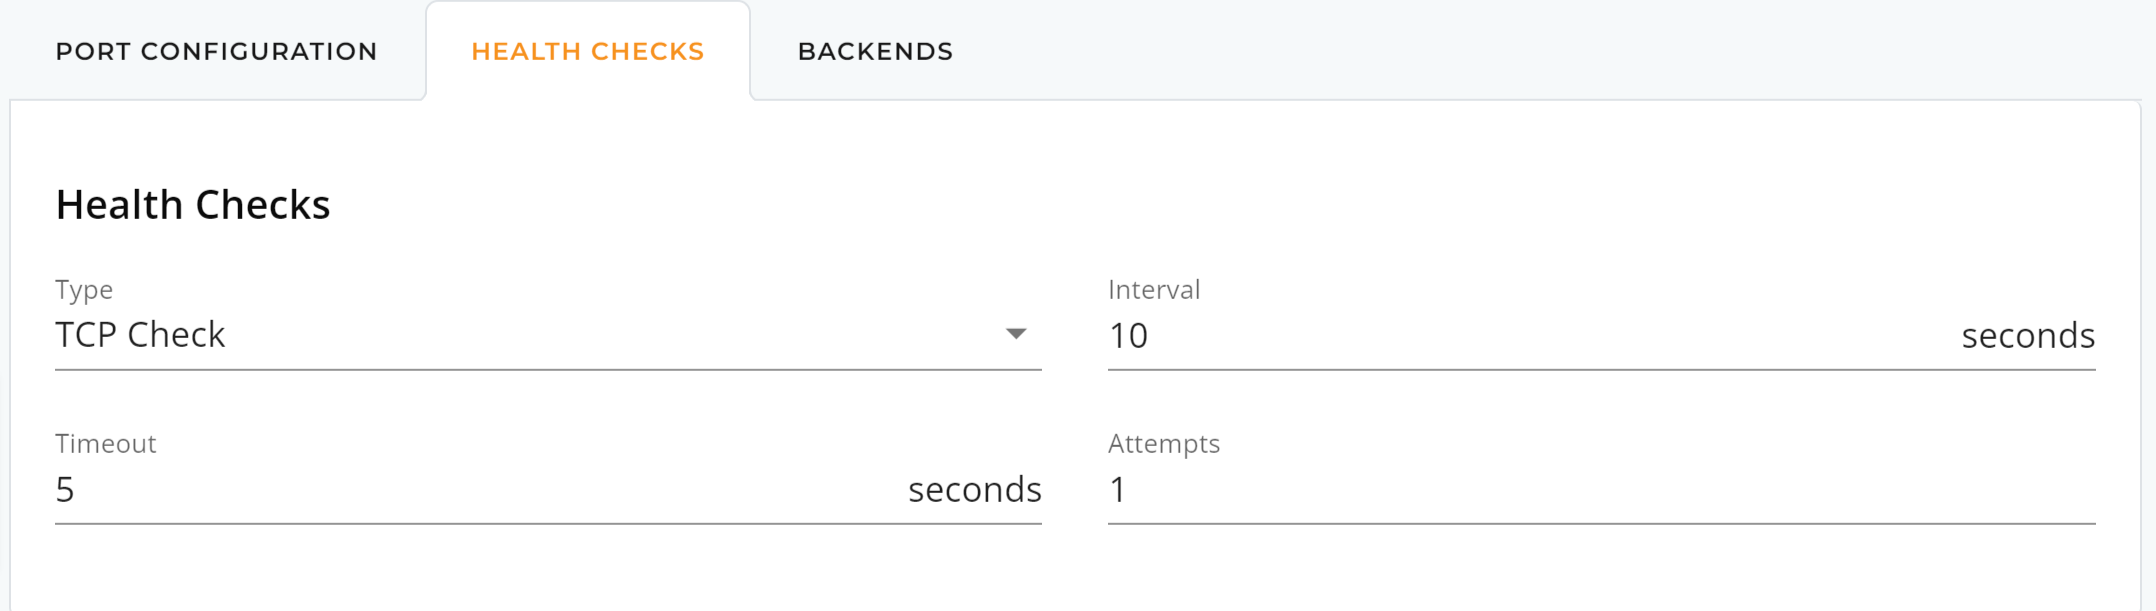
Step 3: Health Checks
You can adjust the health check settings, which includes checking type, interval, timeout, and attempts.
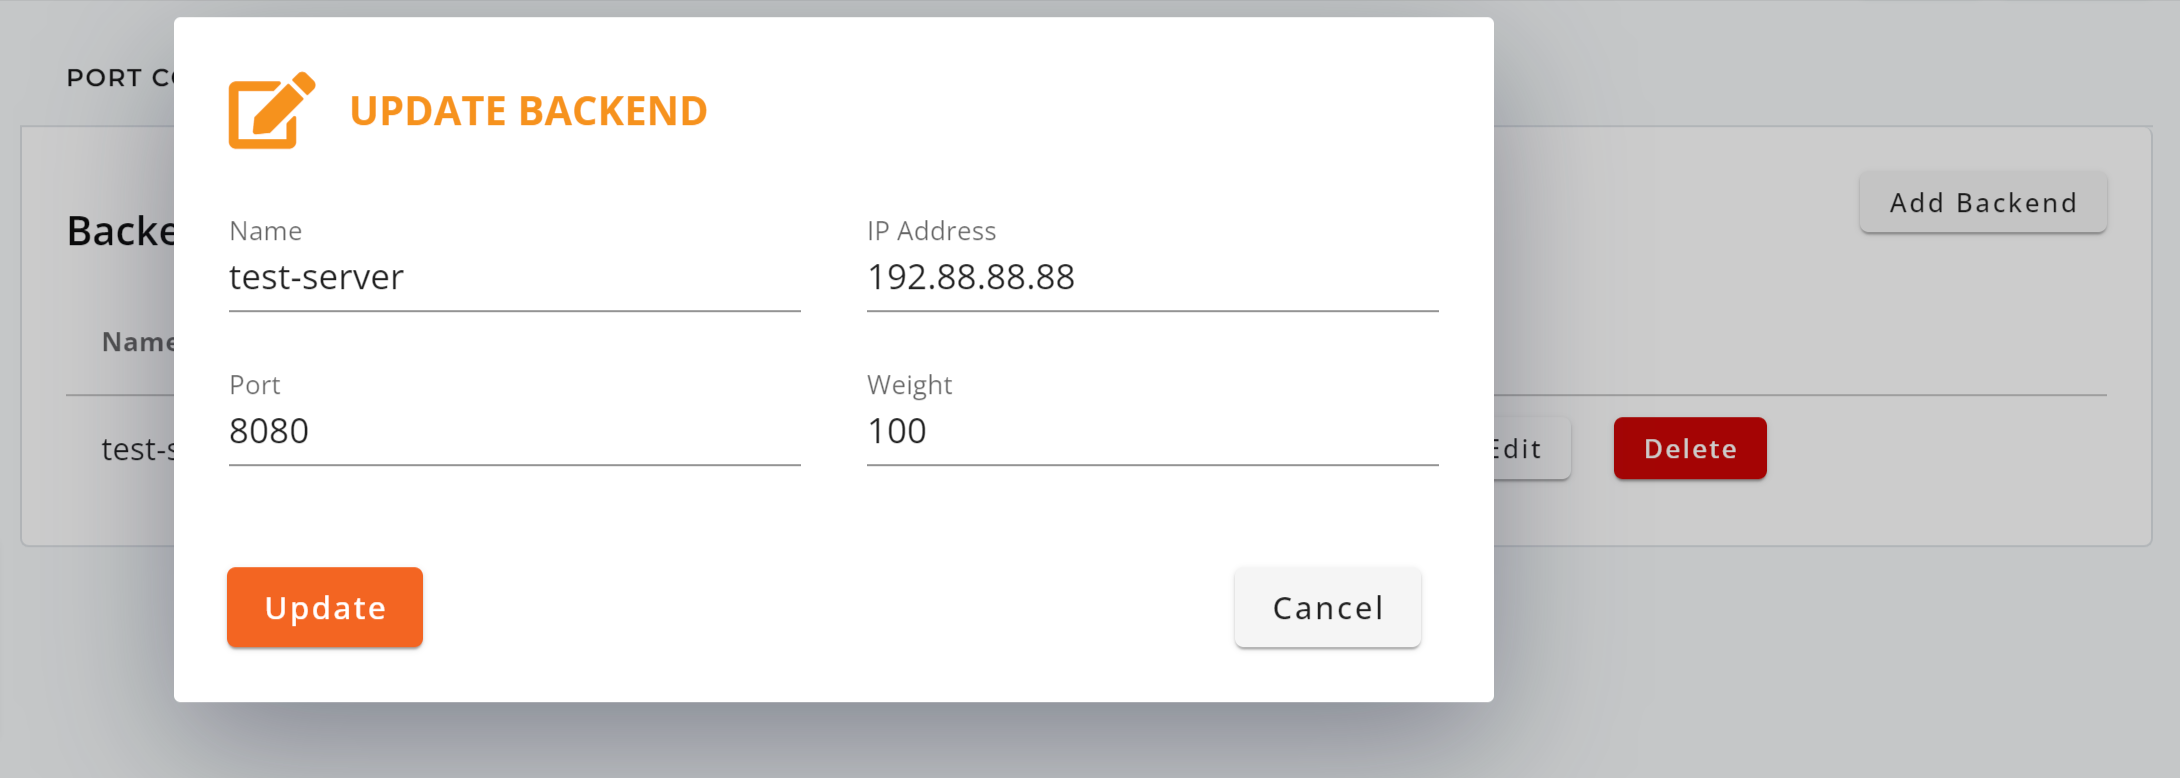
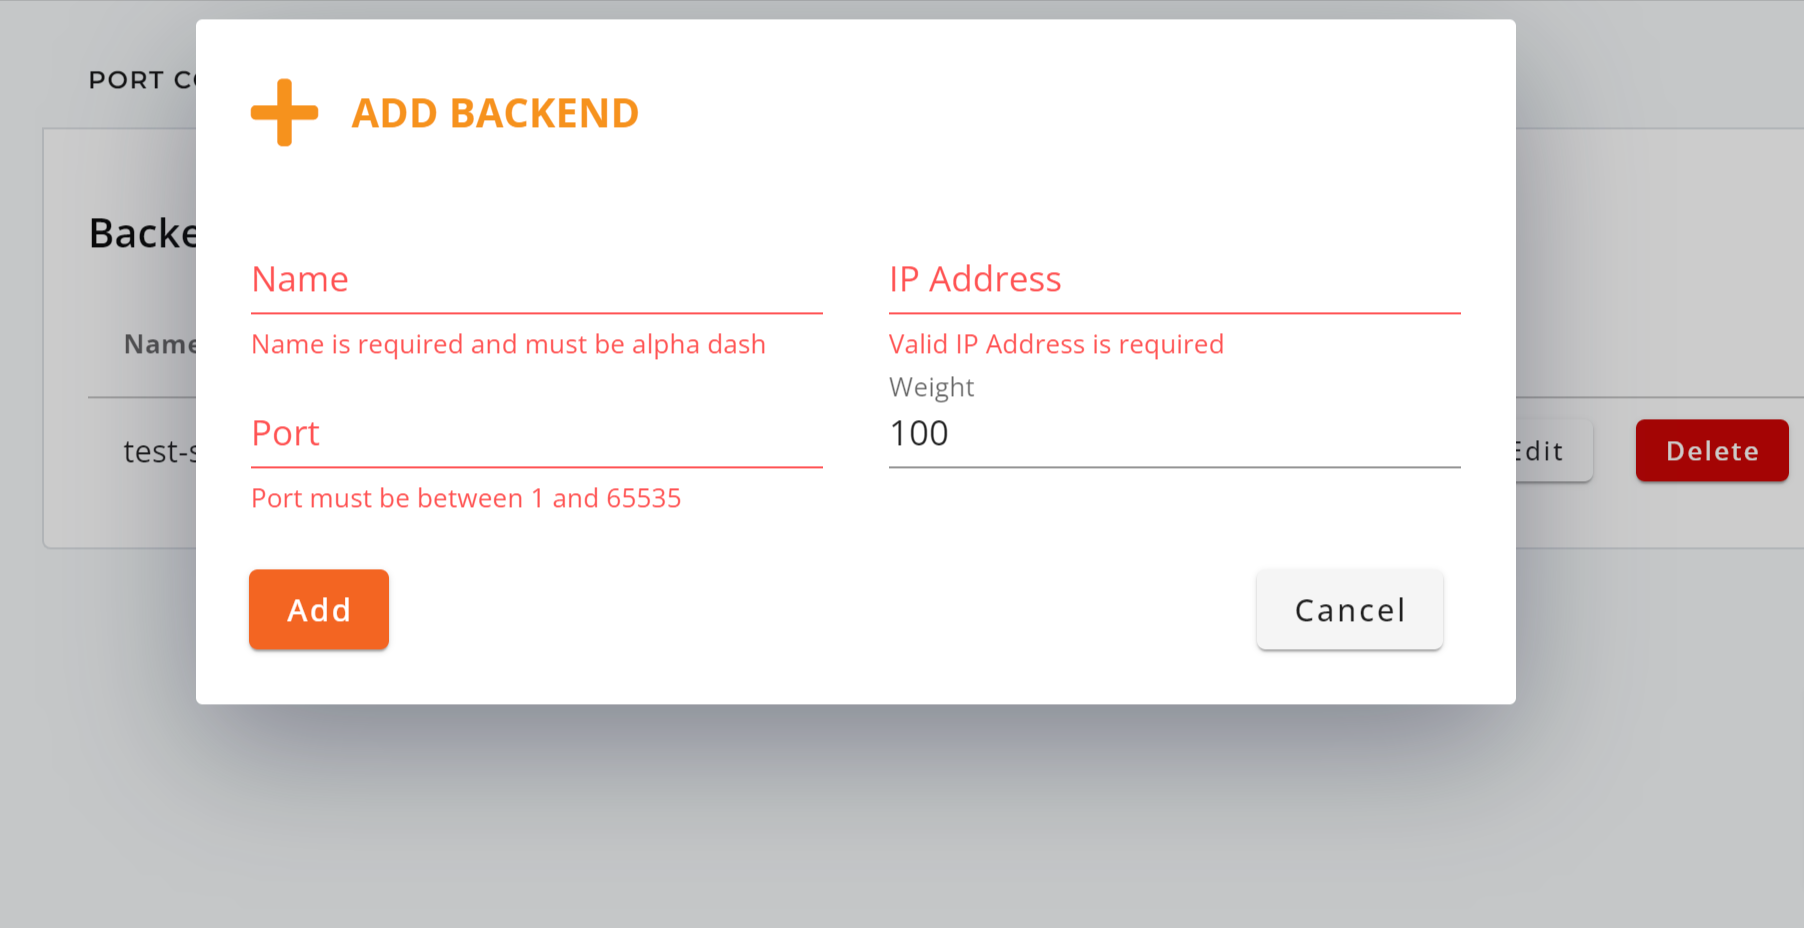
Step 4: Backends
You can adjust or add new backend servers to your existing load balancers.
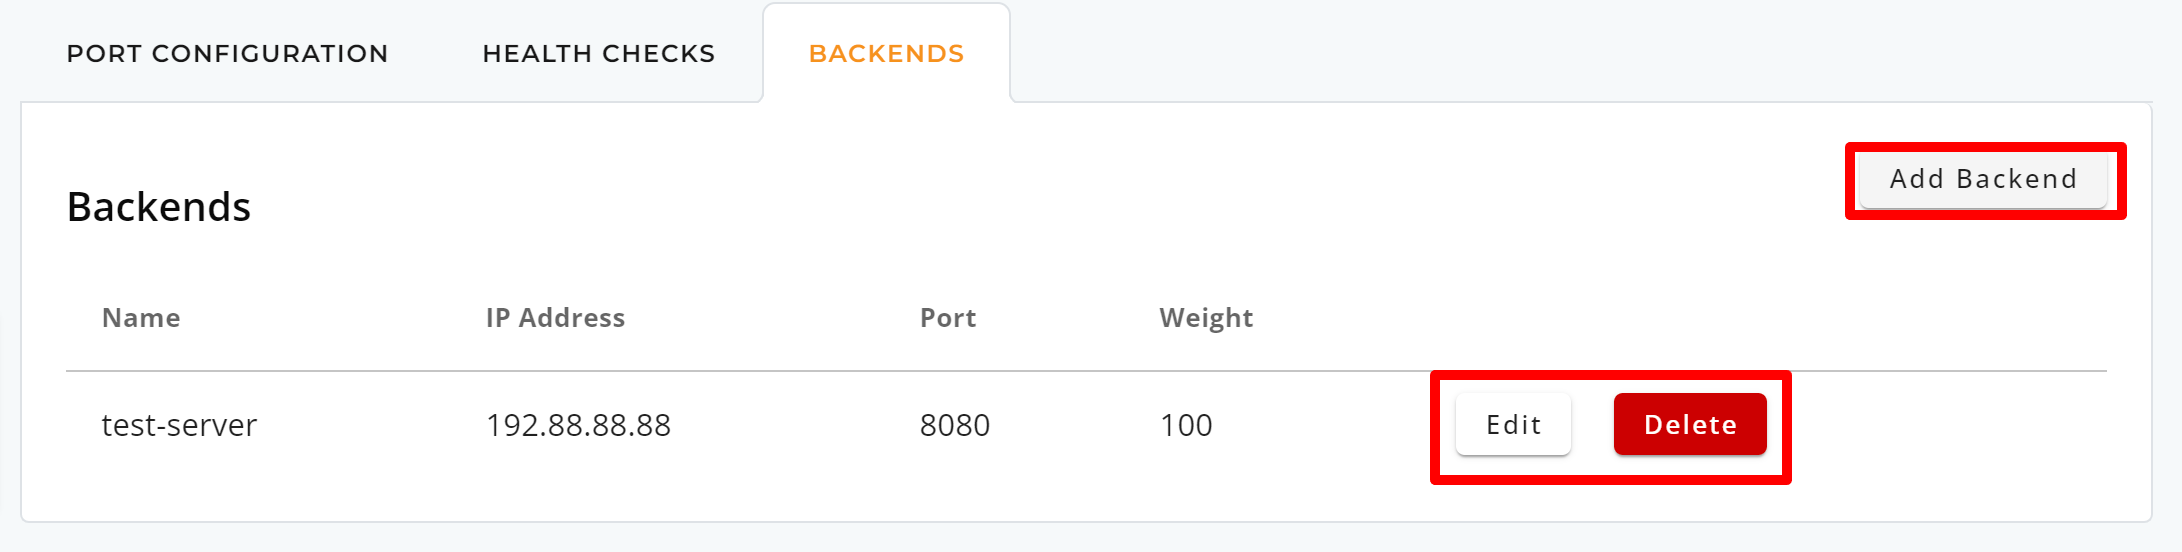
- Current Backends: You can modify the Name, IP Address, Port, and Weight settings within your TCP load balancer configurations.
- New Backends: You can add new backend servers by entering the Name, IP Address, Port, and Weight within your TCP load balancer configurations.
– Step End
Tips
Understanding Port to Listen:
In simple terms, “port to listen” refers to a specific entry point on a computer or server where it waits for incoming data or requests from other devices on a network. It’s like a mailbox or a designated spot where messages or data arrive, and the computer is ready to process them. Each type of service or application often uses a specific port to make sure the right data goes to the right place on the computer.
Here are some commonly used ports for your reference:
| Commonly used ports | – 80: HTTP (unencrypted web traffic)
– 443: HTTPS (secure web traffic) – 21: FTP (File Transfer Protocol) – 22: SSH (Secure Shell) – 25: SMTP (Simple Mail Transfer Protocol) – 110: POP3 (Post Office Protocol version 3) – 143: IMAP (Internet Message Access Protocol) – 53: DNS (Domain Name System) – 3306: MySQL database – 3389: RDP (Remote Desktop Protocol) – 137-139: NetBIOS (File and print sharing) – 23: Telnet (unencrypted remote access) – 119: NNTP (Network News Transfer Protocol) – 69: TFTP (Trivial File Transfer Protocol) – 161-162: SNMP (Simple Network Management Protocol) |
| Registered Ports | – 8080: HTTP Alternate (alternative HTTP port)
– 1433: MSSQL (Microsoft SQL Server) – 1521: Oracle database – 3306: MySQL (alternative usage) – 5432: PostgreSQL database – 5900: VNC (Virtual Network Computing) – 54321: Proxy Trojan (commonly used by malware) – 5060-5061: SIP (Session Initiation Protocol, VoIP) |
| Dynamic and/or Private Ports | From 49152 to 65535 |
Understanding Load Balancer Algorithms:
| Round-Robin | Least Connections | Source | |
| Description | Distributes incoming requests equally to backend servers in a sequential order. | Sends non-sticky requests to the backend server with the fewest active connections. | Ensures that specific client or request traffic is consistently directed to the same available backend server. |
| Load Distribution | Even distribution | Based on connections | Customized based on source |
| Affinity (Session Stickiness) | No | No | Yes |
| Complexity | Easy | Moderate | Moderate |
| Persistence | No | Yes | Yes |
| Response Time | Can vary depending on server order | Typically efficient | Typically efficient |
| Predictability | Can be predictable | Moderate predictability | Moderate predictability |
| Resource Utilization | Resource-efficient | Efficient | Efficient |
| Network Topology | Suitable for various network layouts | Suitable for varying server capacities | Applicable to specific network configurations |
| Compatibility | Works well distributing request traffic to many servers with similar specifications. | Adapts well to servers with varying capacities, making it versatile for different server setups. | Ideal for e-commerce or shopping apps by directing customer requests back to specific servers (ensuring session stickiness). |
| Limitations | Doesn’t consider server load or responsiveness, leading to uneven traffic distribution when servers differ in capacity. | Not ideal for scenarios with short or long-lived connections where connection count doesn’t reflect server load. | May cause uneven server workloads when many connections from clients are concentrated on a single source IP. |
For more info about IP ServerOne’s Load Balancer as a Service, visit ipserverone.com.