Search Our Database
Disabling DNS recursion in Windows
Introduction
DNS recursion can be used maliciously in DNS amplification attacks and other forms of DNS abuse. Disabling DNS recursion on your Windows server is an important step to improve your network security. This guide will walk you through the process of disabling DNS recursion in the Windows DNS server.
Prerequisites
- Administrative access to the Windows server.
- Access to the DNS Manager.
Steps to Disable DNS Recursion
Step 1: Open DNS Manager
- Click on the Start menu, type dnsmgmt.msc , and press Enter to open the DNS Manager. Alternatively, you can find DNS Manager in the Administrative Tools in the Control Panel
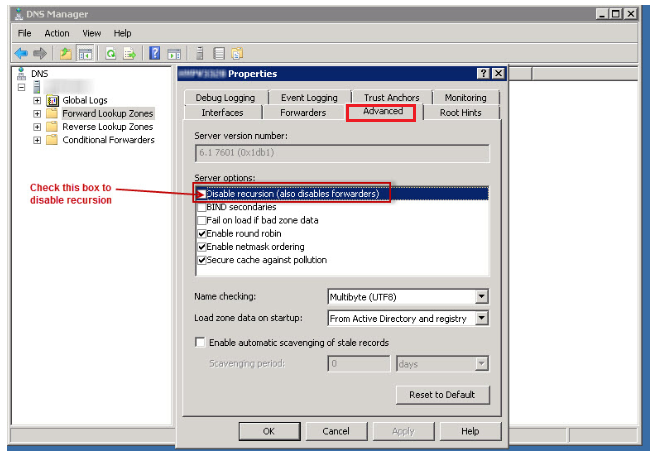
Step 2: Access Server Properties
- In the console tree, right-click the applicable DNS server, then click Properties.
- Click the Advanced tab.
Step 3: Modify the Server Options
- In Server options, select the Disable recursion check box
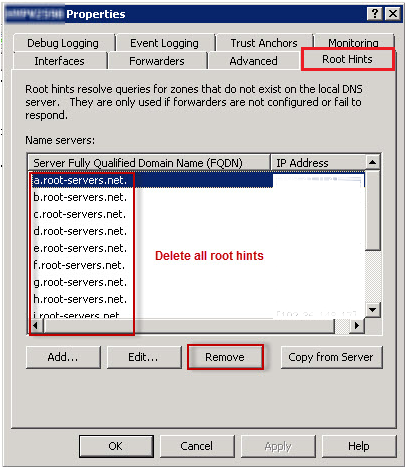
Step 4: Deleting root hint entries:
- Under the Root Hints tab, delete all root hints entries, and then click OK.
Step 5: Confirm Changes
- After applying these changes, restart the DNS service from the Services control panel.
Conclusion
Disabling DNS recursion on your Windows server can significantly enhance your network’s security posture by mitigating the risk of being involved in DNS amplification attacks and other malicious activities. After completing these steps, your server should no longer perform recursive query resolutions for external domains, thus reducing its vulnerability to such exploits.
Should you have any inquiries about the guidelines, please feel free to open a ticket through your portal account or contact us at support@ipserverone.com. We’ll be happy to assist you further.