Search Our Database
How to Set Up DNS Records for Your Webmail in Customer Portal
Introduction
Proper DNS configuration is fundamental for reliable email delivery and maintaining strong domain reputation. Email servers require specific DNS records to authenticate outgoing messages and prevent them from being flagged as spam by recipient mail servers. The IP ServerOne Customer Portal provides a comprehensive DNS management interface that allows users to configure these critical records directly without requiring external DNS providers.
This guide explains how to configure essential DNS records for email services using the NovaCloud > DNS section in the IP ServerOne Customer Portal. Setting up A, MX, SPF, DKIM, and DMARC records ensures your emails are delivered successfully while protecting your domain from spoofing and phishing attacks. The portal’s DNS management tool offers direct control over your domain’s email authentication settings.
Before beginning, ensure your domain is pointing to IP ServerOne’s nameservers and that you have active access to the Customer Portal. While the configuration process is straightforward, DNS propagation may take up to 48 hours for changes to take full effect across all DNS servers.
Prerequisites
- Active access to the IP ServerOne Customer Portal.
- Make sure your domain is pointing to IP SERVERONE’s nameservers.
- A public IP address of the server hosting the mail services
Step-by-step Guide
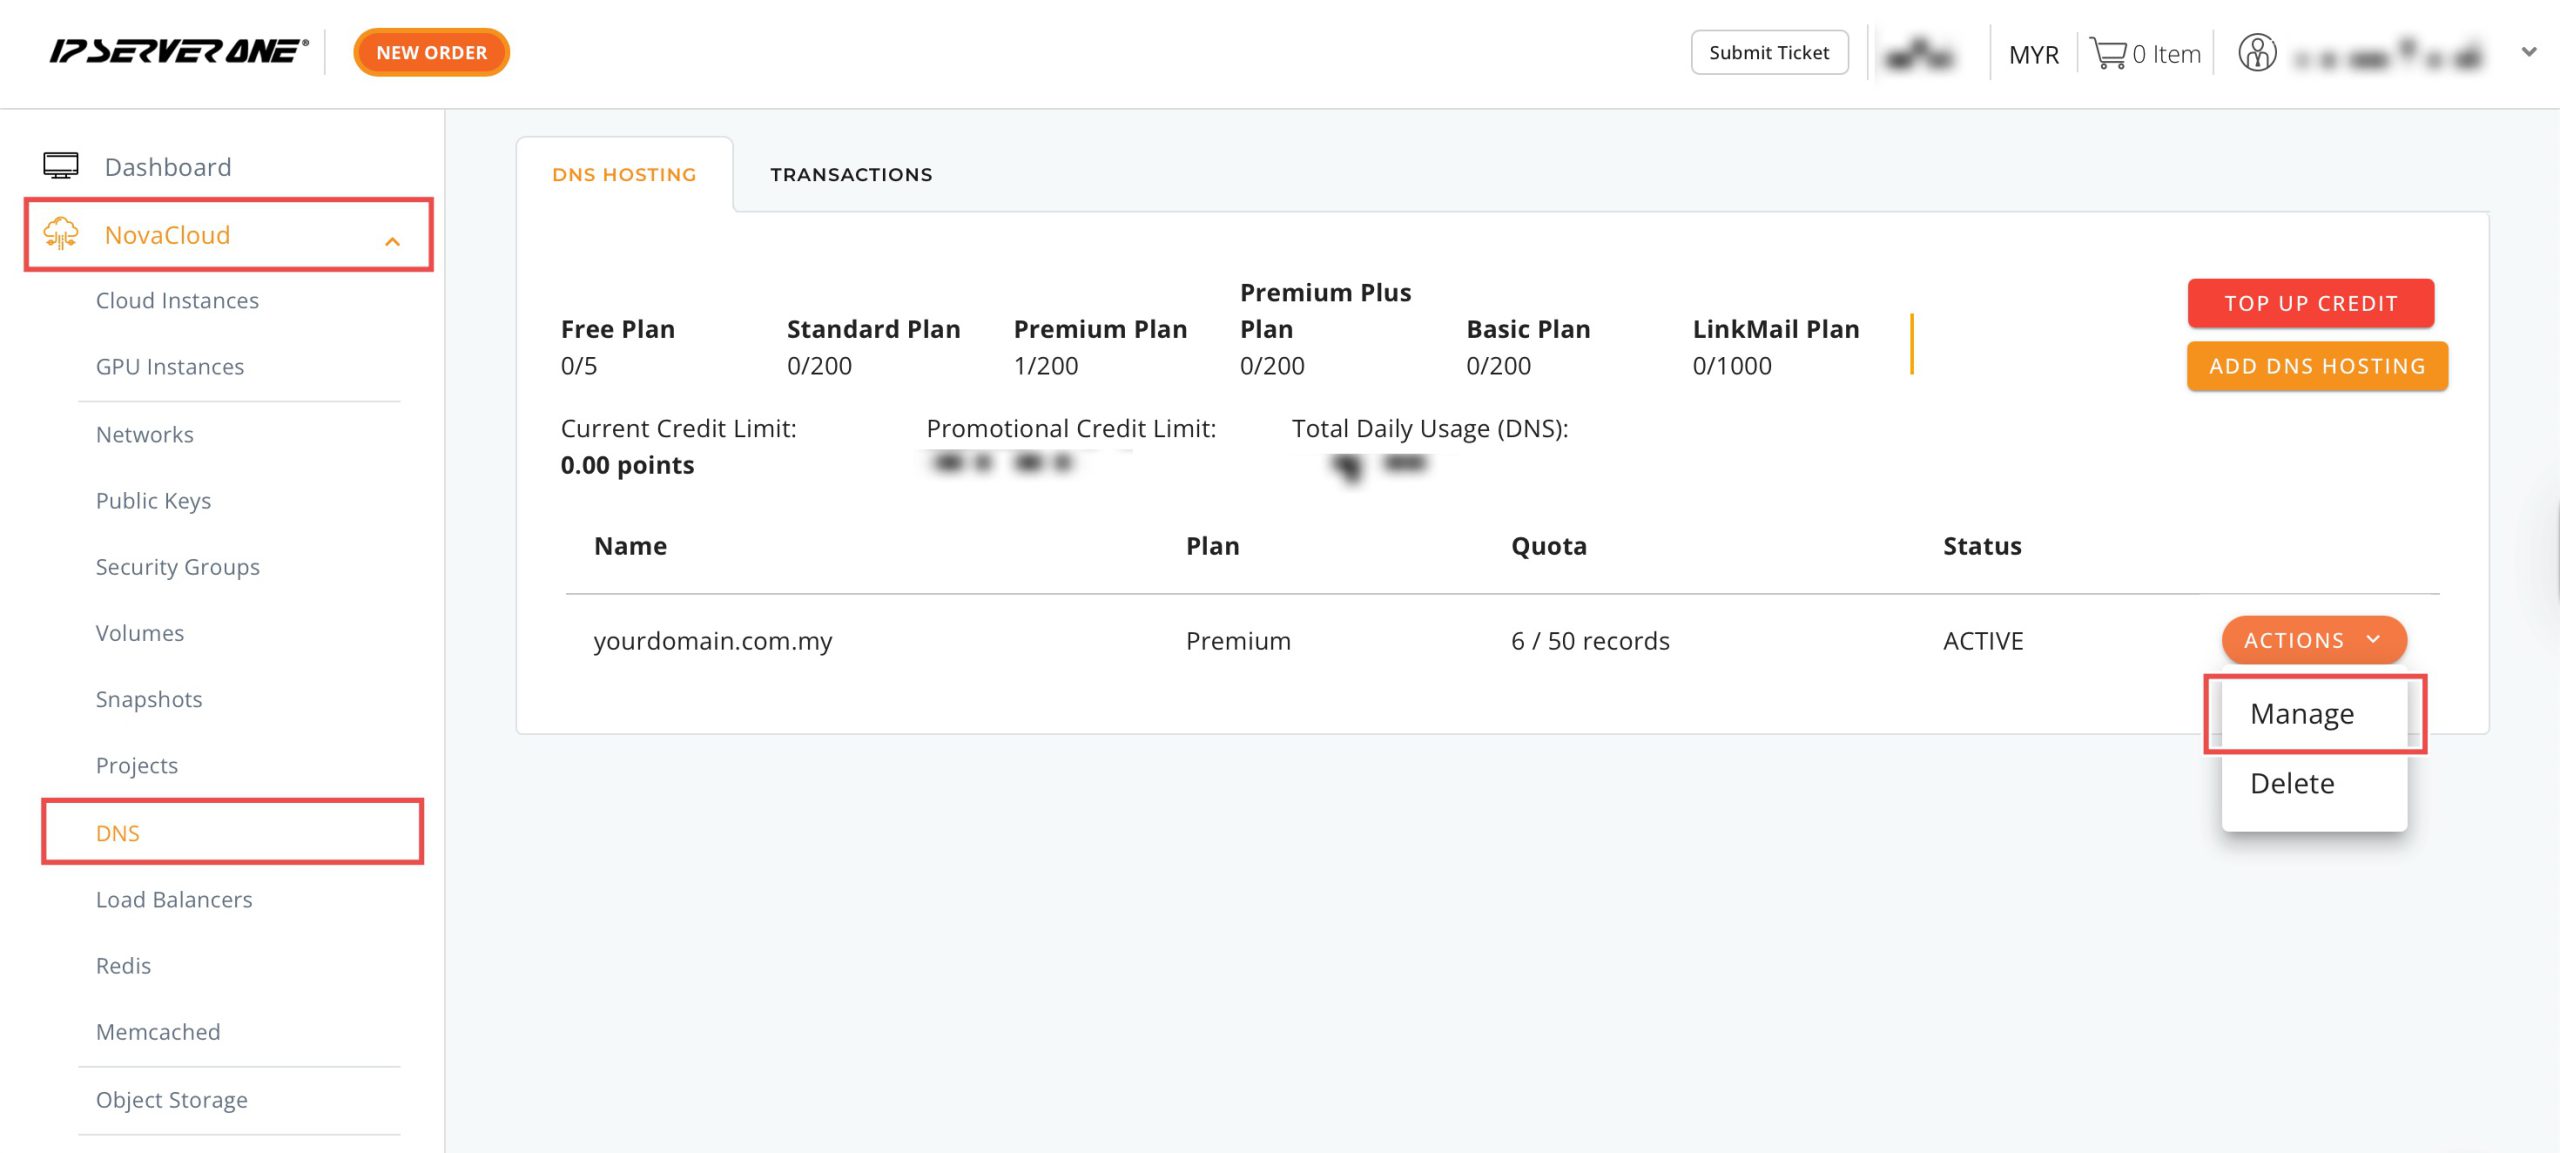
Step 1: Access DNS Records
- Log in to the Customer Portal.
- Click the NovaCloud dropdown menu and click on DNS.
- Click Actions dropdown menu and click on Manage.
You will see the DNS records that have been set up. Normally, an A record, an MX record, and a TXT (SPF) record for the email have been set up by default, then you can skip to step 4, starting from DKIM record. However, in the case that the three records were not listed, you may begin from step 2.
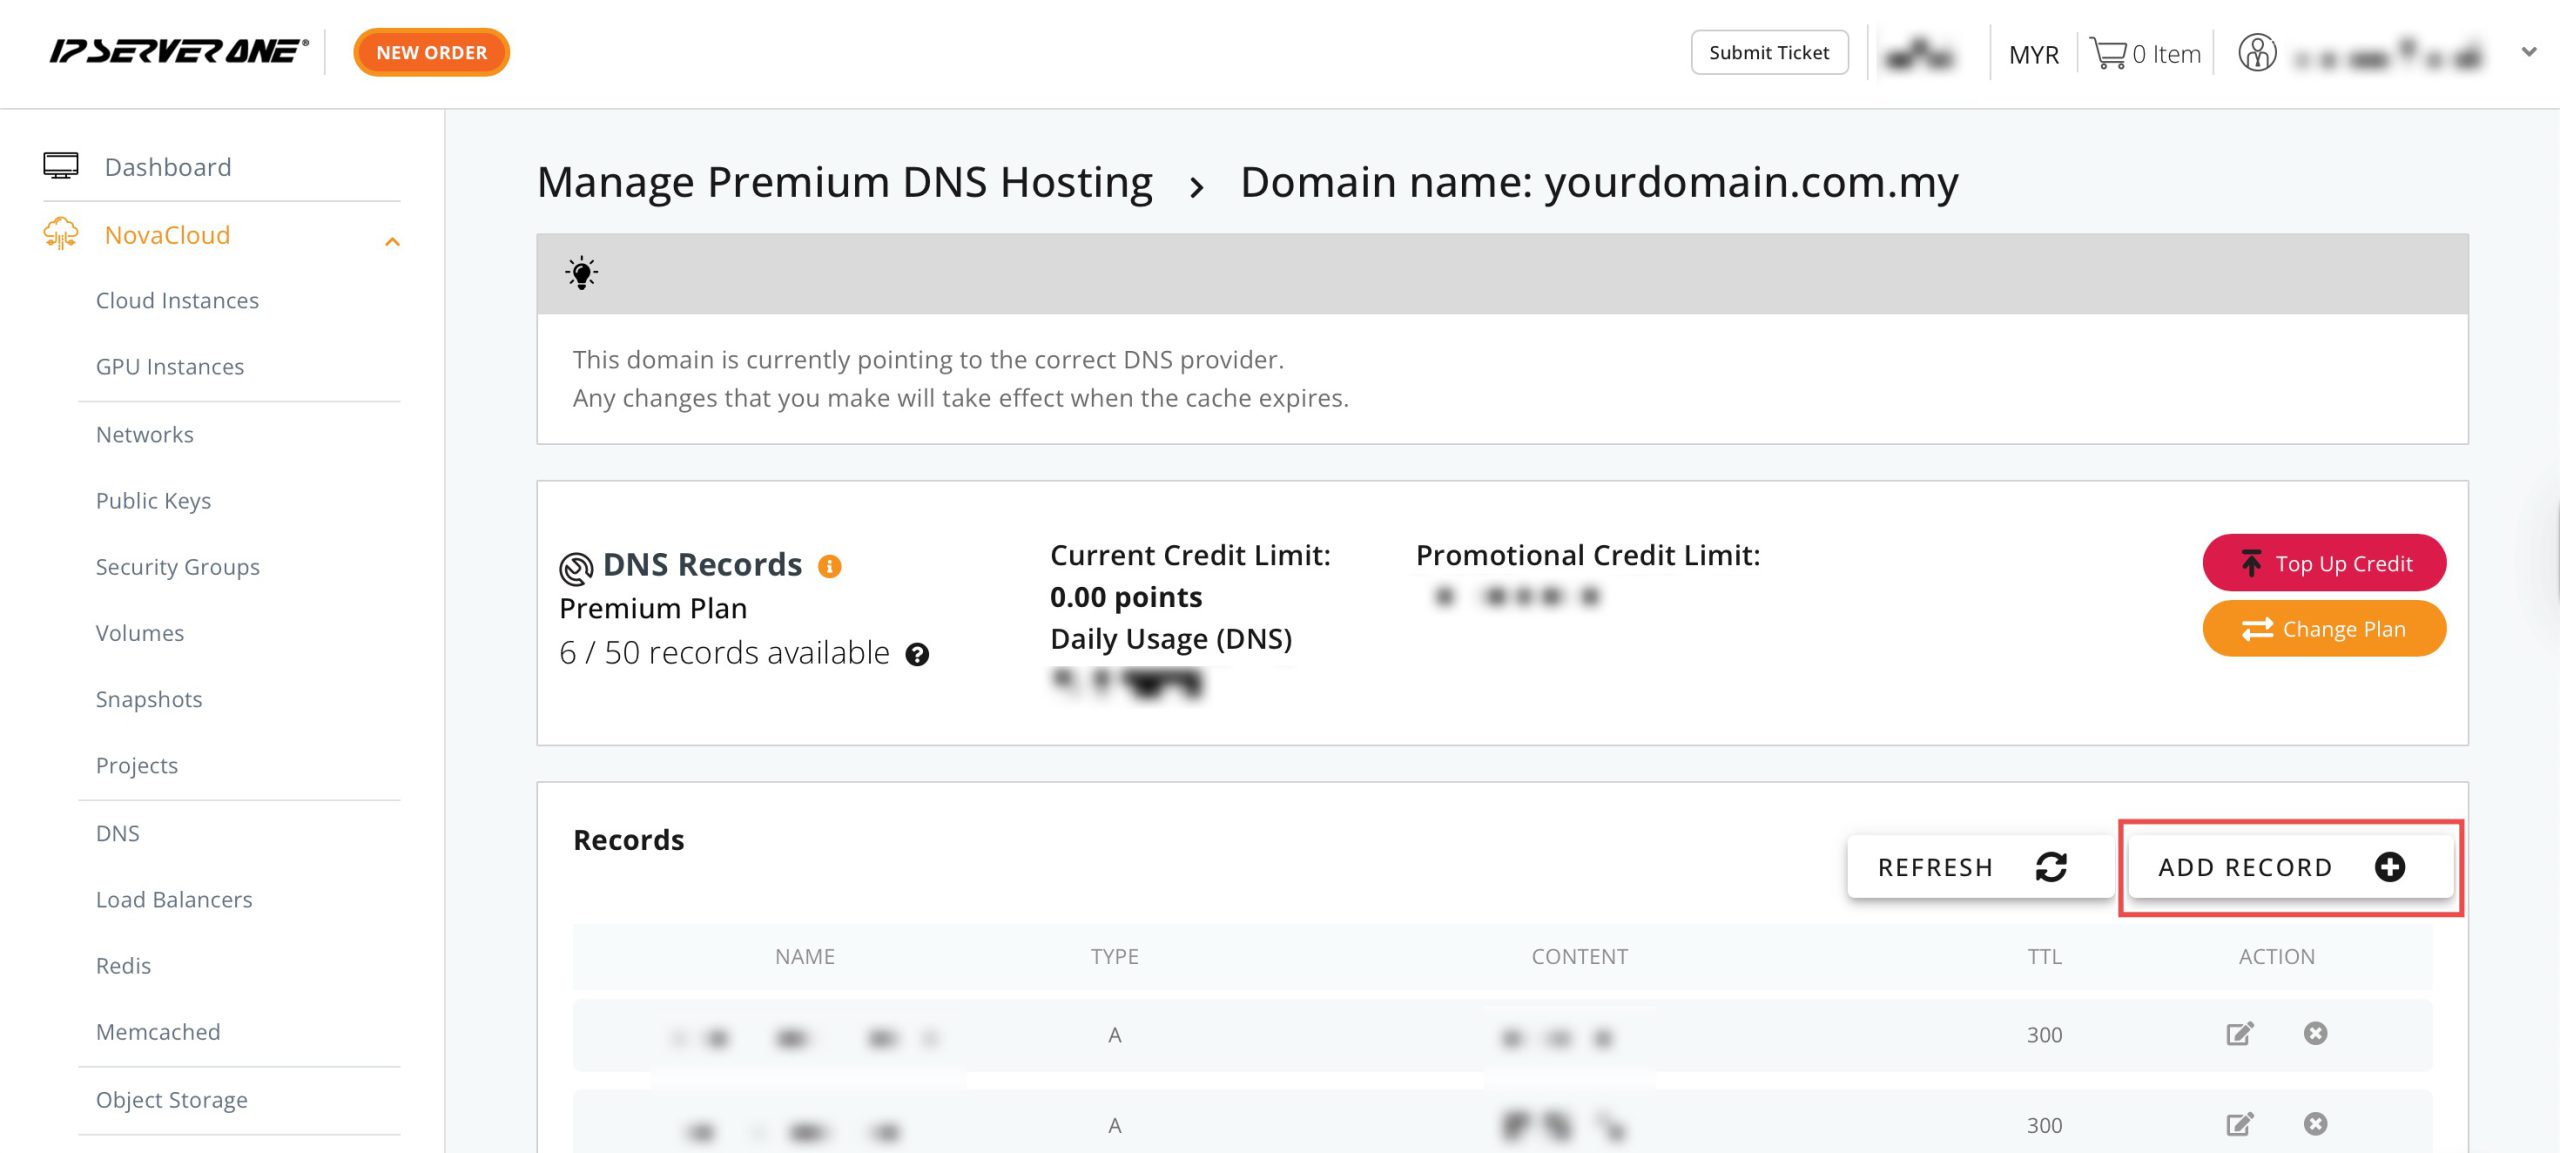
Step 2: Set Up A Record for mail.yourdomain.com
Click Add Record + and a new entry pop-up will appear for you to fill in the record details. Enter the following:
- Name: mail
- Type: A
-
Content: IP address of your mail server
Then, click Add.

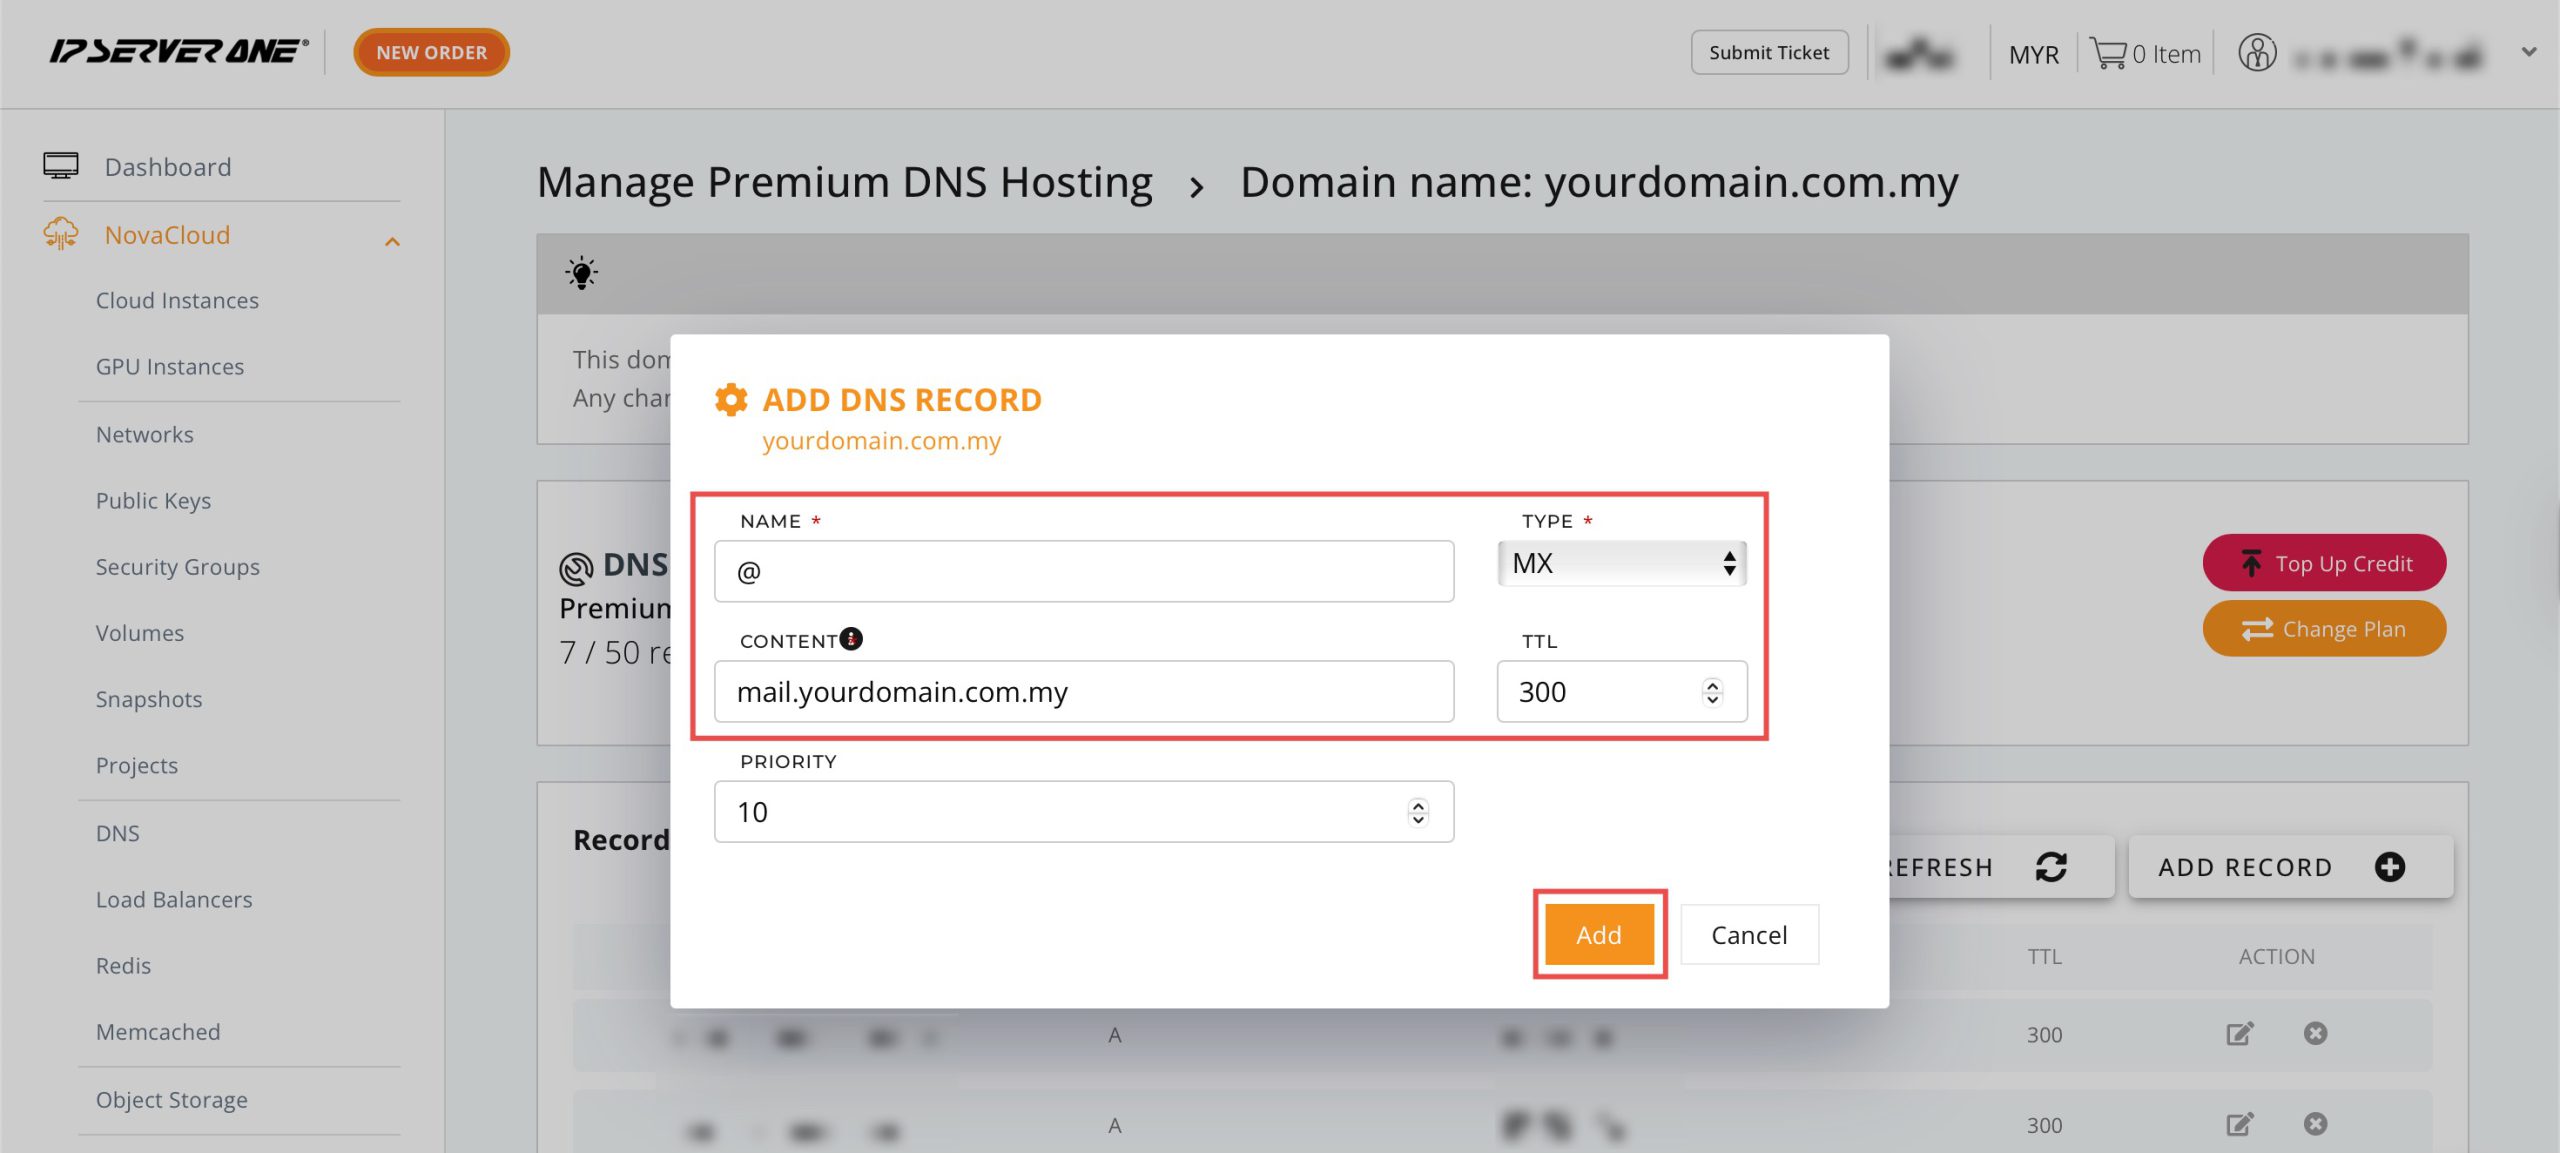
Step 3: Set Up MX Record for yourdomain.com
Add another record and enter the following:
- Name: @
- Type: MX
-
Content: domain of your mail server (e.g, mail.yourdomain.com, webmail.yourdomain.com)
Then, click Add.
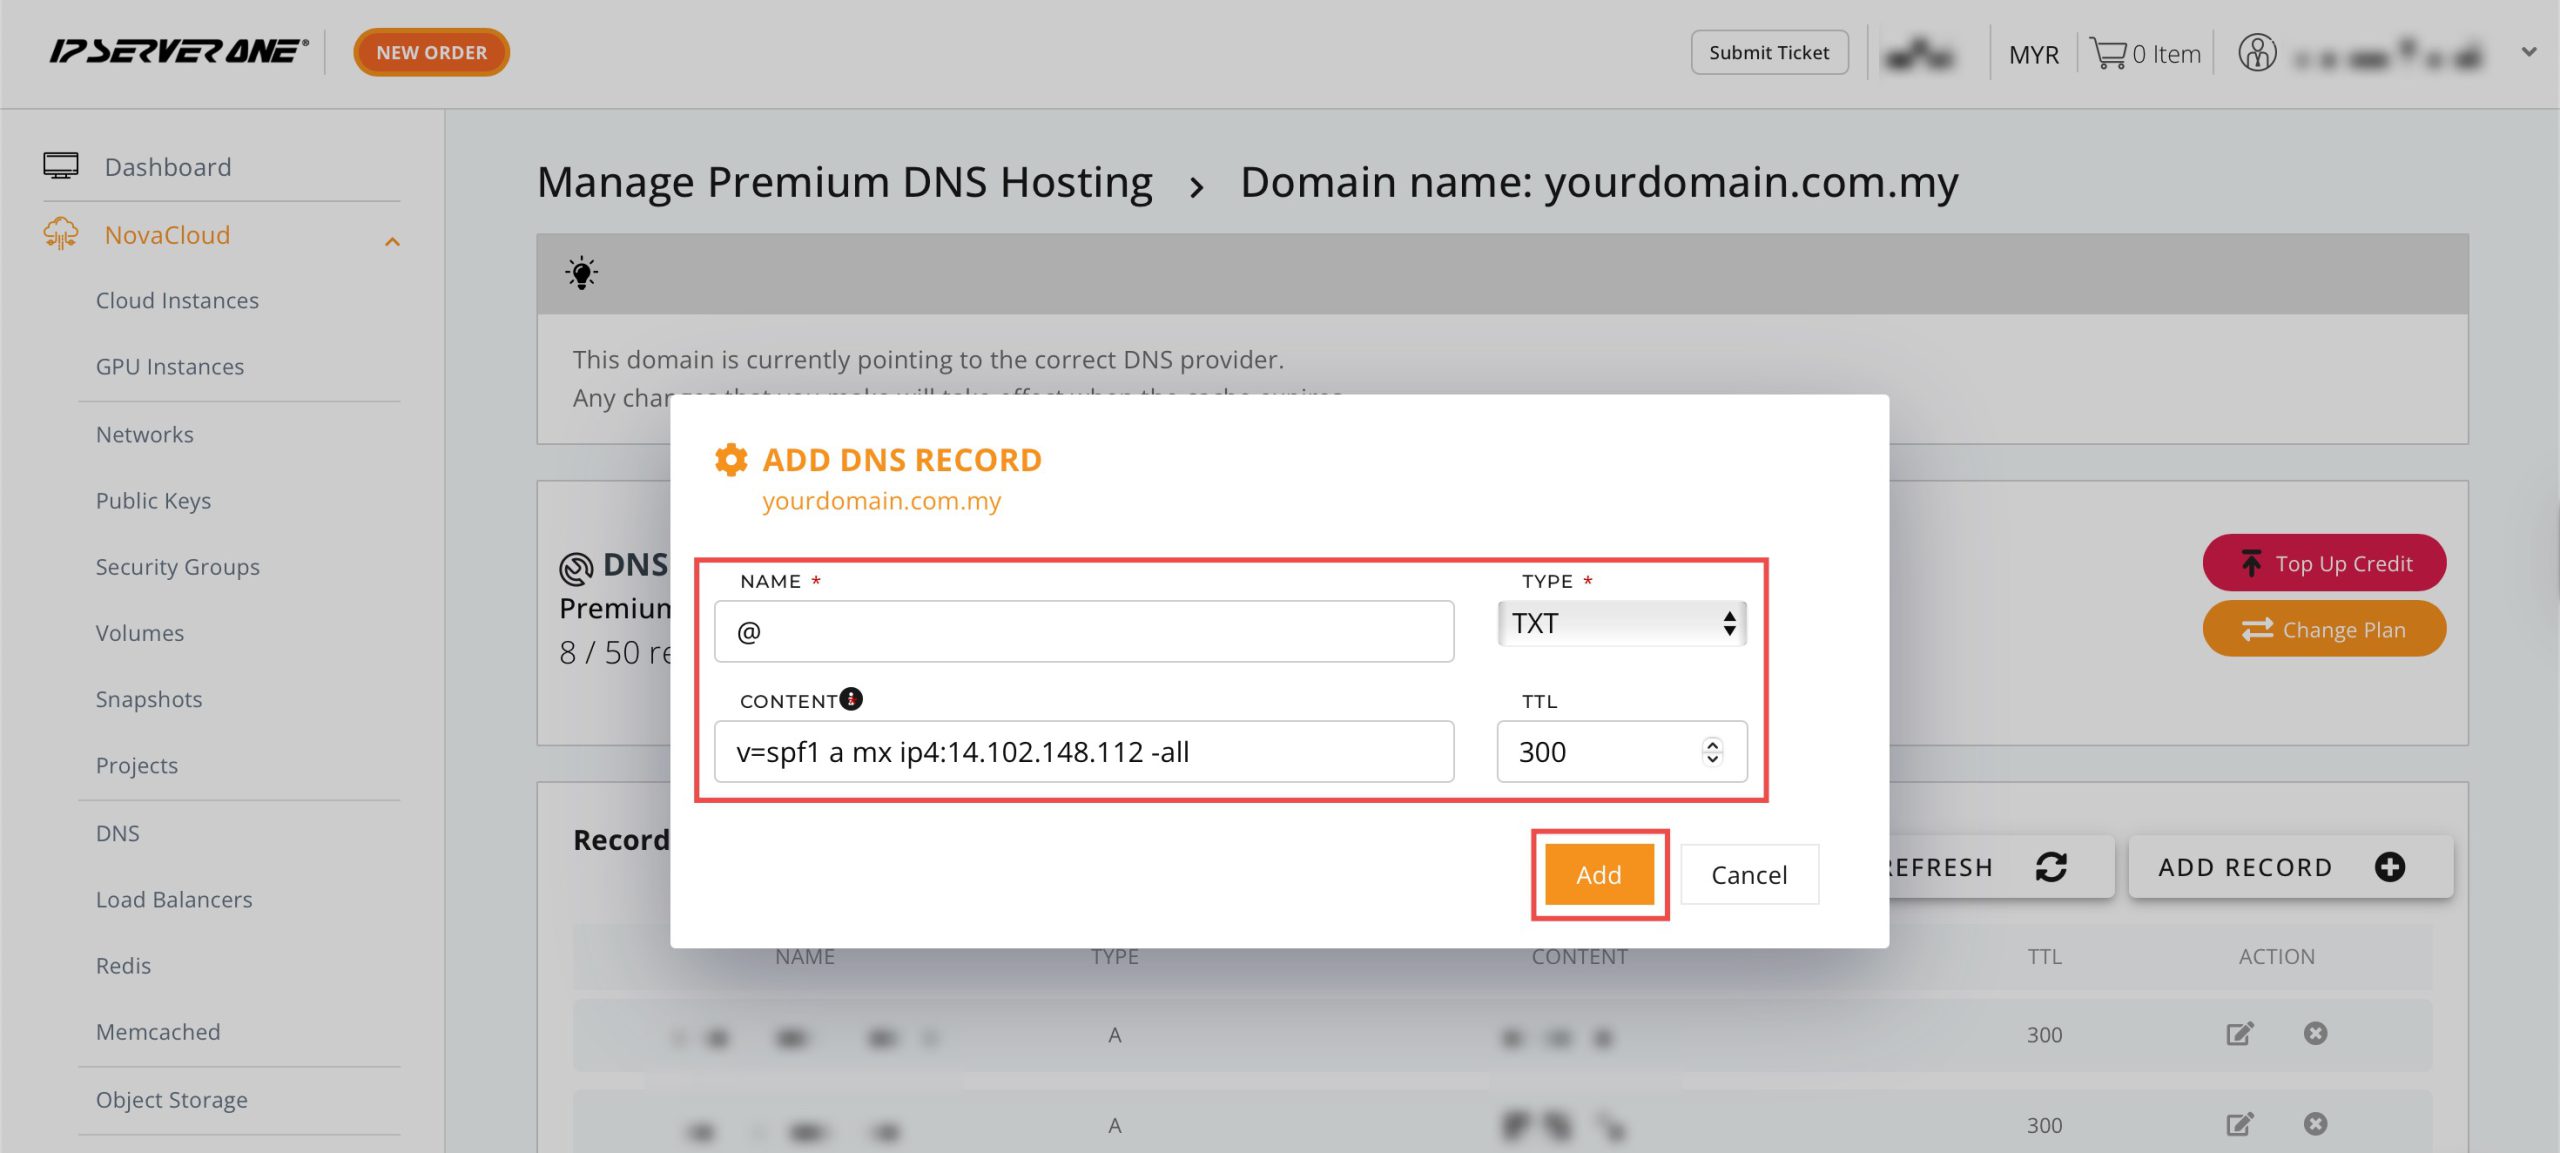
Step 4: Set Up TXT Records
For mail servers, TXT records are essential for verifying your domain and preventing email spoofing. You’ll need to set up three key TXT records to ensure your emails are delivered correctly and securely: SPF, DKIM, and DMARC.
1. SPF Record:
Add another record and enter the following:
- Name: @
- Type: MX
-
Content (example):
v=spf1 a mx ip4:ip-address -all
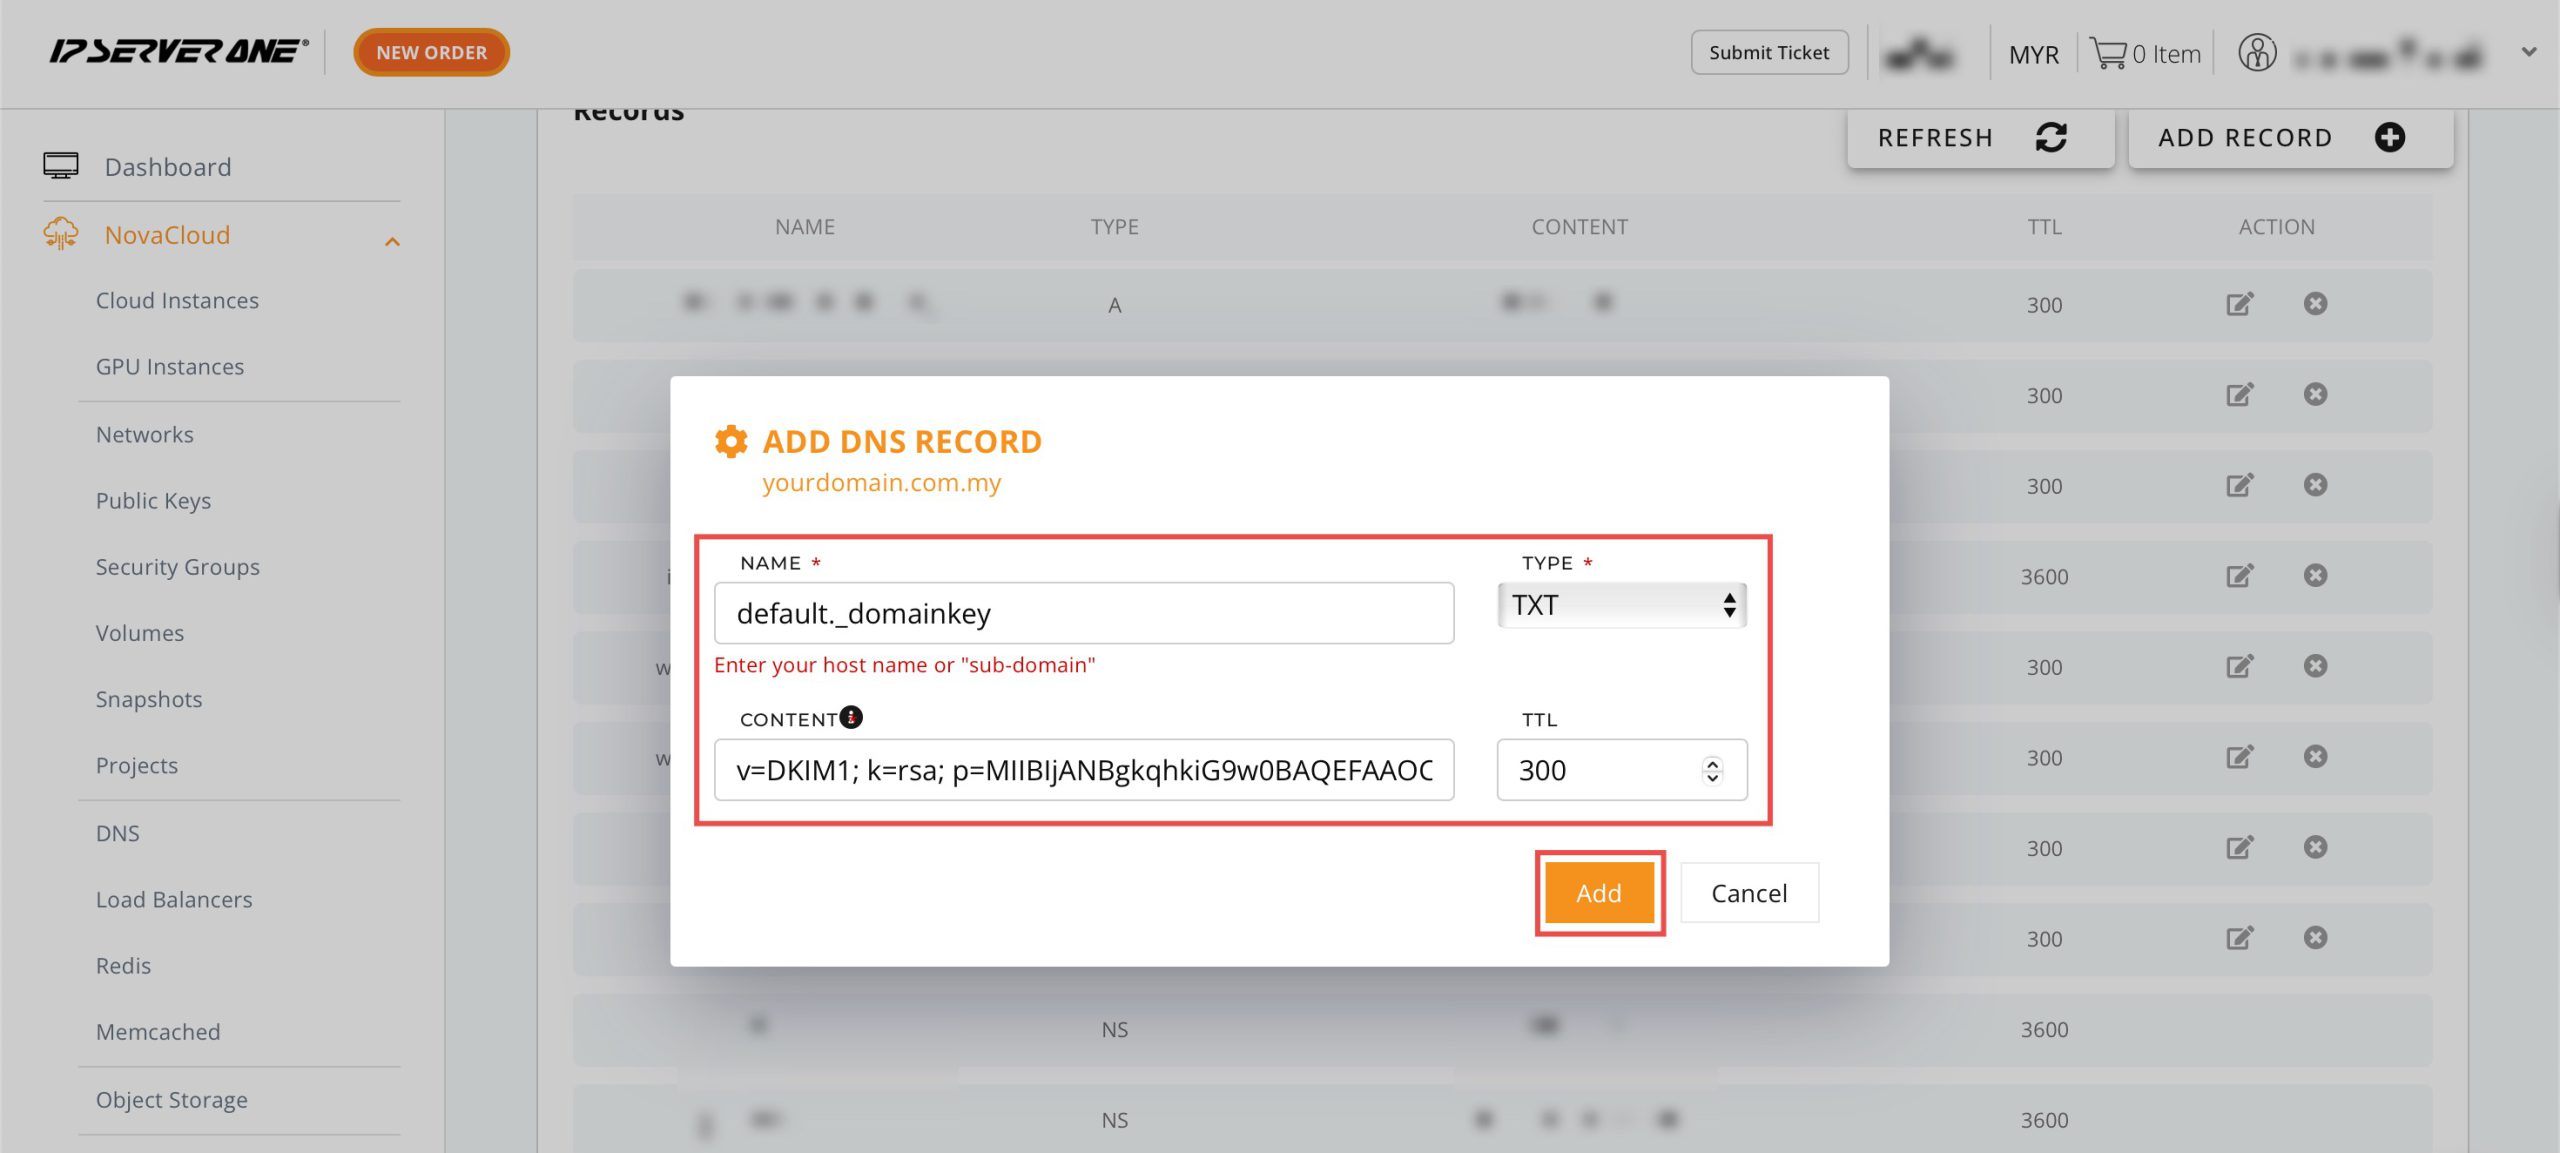
2. DKIM Record:
Since the process to obtain a DKIM record varies, we recommend referring to your specific email service provider or hosting control panel for the most accurate instructions. These platforms will have a dedicated tool to generate and present the necessary key and record details.
Your record details should look like the following:
- Name: default._domainkey
- Type: TXT
- Content: (a long string starting with v=DKIM1; k=rsa; p=.. )
v=DKIM1; k=rsa; p=MIGfMA0GCSqGSIb3DQEBAQUAA4...
3. DMARC Record:
Add another record and enter the following:
- Name: _dmarc
- Type: TXT
- Content: (a string starting with v=DMARC1; p=.. )
v=DMARC1; p=reject; sp=reject; pct=100; adkim=s; aspf=s;

Step 5: Verify DNS Records
After setting the records, use websites such as:
-
or Command line: dig <type> <name>
Example dig command:
dig txt _dmarc.yourdomain.com
Check for correct propagation and syntax. It may take up to 48 hours for DNS changes to take effect.
Step 6: Verify Email Sending and Receiving
After few hours, kindly try sending and receiving emails from your account to confirm that your webmail system is working correctly.
If the DNS changes do not take effect, or if there are issues in sending and receiving, please contact us at support@ipserverone.com for further assistance.
Conclusion
Configuring DNS records for email services through the IP ServerOne Customer Portal is a straightforward process using the NovaCloud > DNS management interface. By properly setting up A, MX, SPF, DKIM, and DMARC records, you establish robust email authentication and protect your domain from malicious use. The portal’s integrated DNS tools provide complete control over your email infrastructure settings.
Remember that DNS changes require up to 48 hours for full propagation. Regular verification using tools like MXToolbox helps ensure your records are functioning correctly and your email system maintains optimal deliverability performance.
Should you have any inquiries about the guidelines, please feel free to open a ticket through your portal account or contact us at support@ipserverone.com. We’ll be happy to assist you further.