Search Our Database
How to change Firewall rules in CentOS 7
Introduction
This article is for system administrators and users managing servers on CentOS 7. It outlines the steps to configure the firewalld service, replacing iptables in CentOS 7, and create custom firewall zones. By doing this, you can allow specific services or ports while blocking unauthorized access, ensuring your system remains secure. These steps are essential for anyone needing to manage firewalld in a structured way to balance security and accessibility.
Prerequisites
- SSH access to the server with root privileges
- Basic knowledge of firewall and networking
Steps
Start Firewall Service
1. Start your firewall service via the command:
systemctl start firewalld.service
Understanding the Firewall Zones
In CentOS 7, the firewalld service is introduced, it also introduces “zones”. Each zone has a different set of firewall rules.
1. You can use this command to get the list of zones
firewall-cmd --get-zones
2. Then, you may use the following command to see which is the default zone that your firewall runs on startup:
firewall-cmd --get-default-zone
3. You can also use this line of command to see which zone is currently active, as well as which Ethernet port is active within the zone:
firewall-cmd --get-active-zones
The following list describes what each of the default zones does:
drop: The lowest level of trust. All incoming connections are dropped without reply and only outgoing connections are possible.
block: Similar to the above, but instead of simply dropping connections, incoming requests are rejected with an icmp-host-prohibited or icmp6-adm-prohibited message.
public: Represents public, untrusted networks. You don’t trust other computers but may allow selected incoming connections on a case-by-case basis.
external: External networks in the event that you are using the firewall as your gateway. It is configured for NAT masquerading so that your internal network remains private but reachable.
internal: The other side of the external zone, used for the internal portion of a gateway. The computers are fairly trustworthy and some additional services are available.
dmz: Used for computers located in a DMZ (isolated computers that will not have access to the rest of your network). Only certain incoming connections are allowed.
work: Used for work machines. Trust most of the computers in the network. A few more services might be allowed.
home: A home environment. It generally implies that you trust most of the other computers and that a few more services will be accepted.
trusted: Trust all of the machines in the network. The most open of the available options and should be used sparingly.
Create Custom Zones
1. To avoid misconfiguration of the default zones, we can make our zones with its own set of rules, using the command:
firewall-cmd --permanent --new-zone=sshweb
This creates a zone called “ssh web”. A “success” will be outputted to show that the zone is created successfully, or you can confirm it using:
firewall-cmd --permanent --get-zones
2. But,it won’t be available in the current firewall instance, as you can see by using the command without the “–permanent” prefix:
firewall-cmd --get-zones
![]()
3. To add it into the firewall’s active configuration, we need to reload the firewall first, then check the zones again:
sudo firewall-cmd --reload
firewall-cmd --get-zones

Configure the Zone Service
1. The example zone “ssh web” is created to allow SSH and HTTP services, and we can add services to our zone using the command:
firewall-cmd --zone=sshweb --add-service=ssh
firewall-cmd --zone=sshweb --add-service=http
firewall-cmd --zone=sshweb --add-service=https
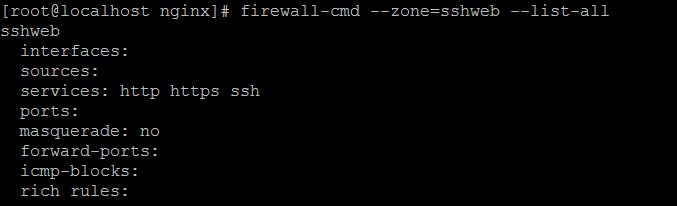
2. After that, use the following command to check if the services are added correctly:
firewall-cmd --zone=sshweb --list-all
3. Now test the configurations. If it works, the we reapply the rules using “–permanent” prefix:
firewall-cmd --zone=sshweb --permanent --add-service=ssh
firewall-cmd --zone=sshweb --permanent --add-service=http
firewall-cmd --zone=sshweb --permanent --add-service=https
Important Note: Don’t restart the service yet, as we still need to assign ports for bypassing the firewall. If not, you might get locked out from accessing the server.
Configure Zone Ports
1. To allow a specific port to pass through firewall (80 for HTTP and ssh_port number for SSH), use the following command:
firewall-cmd --zone=sshweb --permanent --add-port=80/tcp
firewall-cmd --zone=sshweb --permanent --add-port=<your_ssh_port>/tcp
Note: Adding a “–permanent” prefix will make the setting stay even after the system reboot.
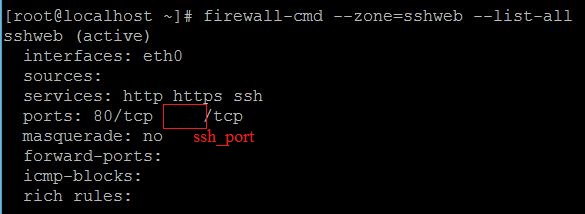
2. This adds the port into the zone’s whitelist. To verify if the port is successfully added, type in:
sudo firewall-cmd --reload
firewall-cmd --zone=sshweb --list-all
3. Look at the “port” line and check if the port you added is listed. There is also other information about the zone you are currently using.
4. Restart the firewall service and check the services using the commands:
systemctl restart firewalld.service
Set Zone Interface
1. To use the custom zone, we need to add our interface, eth0 to the zone that we have created:
firewall-cmd --zone=sshweb --change-interface=eth0
2. We can then check if it’s added using the command:
firewall-cmd --zone=sshweb --list-all
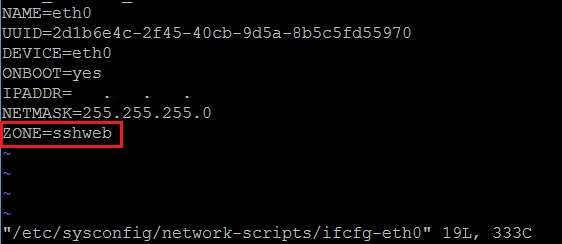
3. To fully associate the interface with our custom zone (prevent it from reverting to using default zone “public”), access the network config file for the interface eth0 and add in the line “ZONE=sshweb”.
vi /etc/sysconfig/network-scripts/ifcfg-eth0
4. Restart your network and firewall services using the following commands:
systemctl restart network.service
systemctl restart firewalld.service
5. Now you can check your active zones using the line:
firewall-cmd --get-active-zones

6. Now all ports other than the ones you have set in the zone will be blocked.
Conclusion
By following this guide, you can configure Firewalld on CentOS 7 to create a secure, custom firewall setup that limits access to only authorized services and ports. This approach balances security with accessibility, ensuring that your system is protected from unauthorized access while still allowing necessary traffic.
Article posted on 18 April 2020.