Search Our Database
How to enable “Under Attack Mode” for a Domain in a Cloudflare Account
Introduction
Cloudflare’s Under Attack Mode (UAM) is a defensive feature that provides temporary protection for websites experiencing suspicious or malicious traffic, such as Layer 7 DDoS attacks or HTTP floods. When enabled, UAM presents a browser verification page to each visitor before granting access to the website, effectively filtering out automated requests and bots.
This feature is particularly useful for websites under active attack, and it can be enabled instantly via the Cloudflare Dashboard. As of recent updates, Cloudflare has simplified the activation process, making it accessible directly from the Overview page under the Quick Actions section. This allows domain administrators to respond quickly to emerging threats without navigating through multiple menus.
UAM is suited for domain owners, IT administrators, and security engineers managing public-facing web services. While it provides immediate protection, UAM is meant to be temporary and should be disabled once the threat subsides to avoid unnecessary friction for legitimate users.
This guide outlines the simplified steps to enable Under Attack Mode via the Cloudflare Dashboard and also includes the API method for automated or advanced implementations.
Prerequisites
- A verified and active Cloudflare account.
- The domain must be active in Cloudflare and show a green “Active” badge.
- Access to the Cloudflare Dashboard.
- (Optional) API token or key for enabling UAM via the Cloudflare API.
Step-by-step Guide
Step 1: Enable Under Attack Mode via the Dashboard
- Log in to your Cloudflare account at https://dash.cloudflare.com.
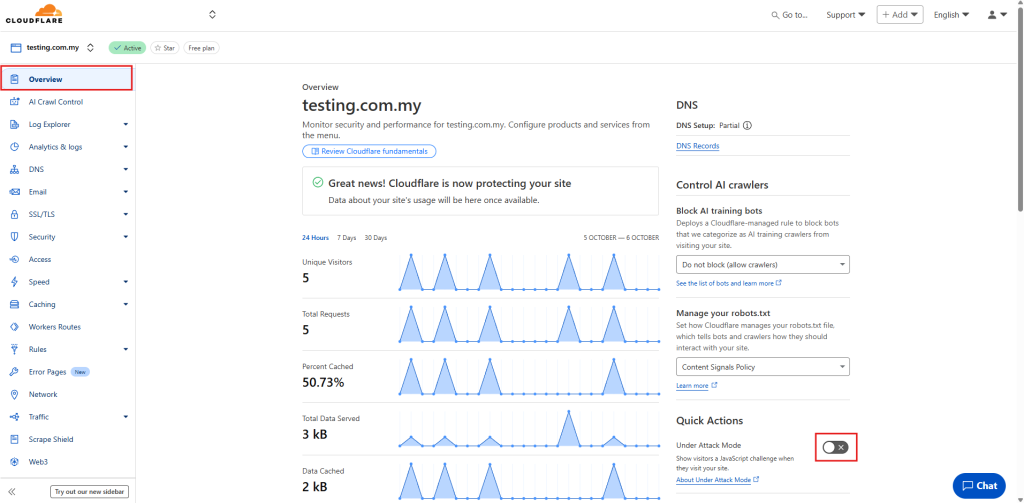
- From the list of domains, select the domain to protect (e.g., testing.com.my).
- In the Overview tab, locate the Quick Actions panel on the right-hand side.
- Find the Under Attack Mode toggle switch.
- Click the toggle to enable it. A browser challenge page will be activated immediately for all incoming traffic.
Step 2: (Optional) Enable Under Attack Mode via API
To enable Under Attack Mode using the Cloudflare API:
curl -X PATCH "https://api.cloudflare.com/client/v4/zones/<ZONE_ID>/settings/security_level" \
-H "Authorization: Bearer <API_TOKEN>" \
-H "Content-Type: application/json" \
--data '{"value":"under_attack"}'
- Replace <ZONE_ID> with the Cloudflare Zone ID of your domain.
- Replace <API_TOKEN> with an API token with zone:edit permissions.
🖊️ Tip: Use the API method to automate attack responses using monitoring tools or security incident workflows.
Conclusion
Under Attack Mode provides an immediate way to defend a website against suspicious or malicious traffic spikes. With Cloudflare’s updated dashboard, it can now be enabled in seconds using the Quick Actions panel under the Overview tab. For more advanced use cases, Cloudflare’s API allows programmatic control of this feature. Remember to disable UAM once the issue is resolved to maintain a smooth experience for legitimate users.
Should you have any inquiries about the guidelines, please feel free to open a ticket through your portal account or contact us at support@ipserverone.com. We’ll be happy to assist you further.
