Search Our Database
Resolving “Timed Out While Connecting To” Error in FortiClient VPN 7.4.x Using GUI configuration
Introduction
In FortiClient VPN version 7.4.x, users frequently encounter the error message “Timed out while connecting to”, particularly when setting up IPsec VPN tunnels. This issue often stems from a mismatch in Phase 1 or Phase 2 configurations between the FortiClient and the FortiGate firewall, particularly in areas like IKE version, mode, encryption, authentication, or DH group settings.
This knowledge base article addresses the GUI configuration required on the FortiGate side to successfully establish an IPsec VPN tunnel with FortiClient VPN 7.4.x. The focus is on aligning the IKE, Phase 1, and Phase 2 settings with FortiClient defaults to prevent handshake timeouts and ensure reliable tunnel negotiation.
The problem primarily affects administrators and users setting up site-to-site or remote access IPsec VPNs where FortiClient is used as the VPN client. It is common in enterprise environments or remote work scenarios where users rely on FortiClient to access internal resources securely.
A common cause of this error includes incorrect IKE mode (Main vs. Aggressive), unsupported encryption/authentication algorithms, or misconfigured DH groups. By following the configuration steps detailed in this guide, administrators can ensure VPN compatibility and resolve time-out errors during tunnel initialization.
The guide utilizes FortiGate’s web GUI (graphical interface), which is suitable for administrators who prefer point-and-click configuration over CLI. Screenshots are provided to clearly identify the exact options to configure, with specific emphasis on matching settings to FortiClient VPN behavior.
Prerequisites
- FortiGate firewall with administrative access via GUI
- FortiClient VPN version 7.4.x installed on client device
- A configured IPsec VPN tunnel on both FortiGate and FortiClient
- Knowledge of internal IP addressing and authentication method (e.g., PSK or certificate)
Step-by-step Guide
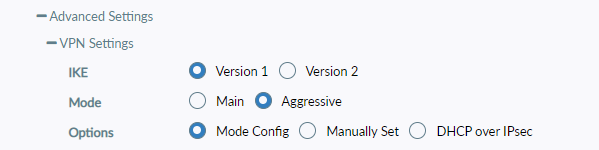
Step 1: Configure IKE Version and Mode in VPN Settings
Navigate to VPN Settings in the Forticlient GUI and expand the Advanced Settings.
Ensure the following settings are configured:
- IKE Version: Version 1
- Mode: Aggressive
- Options: Mode Config
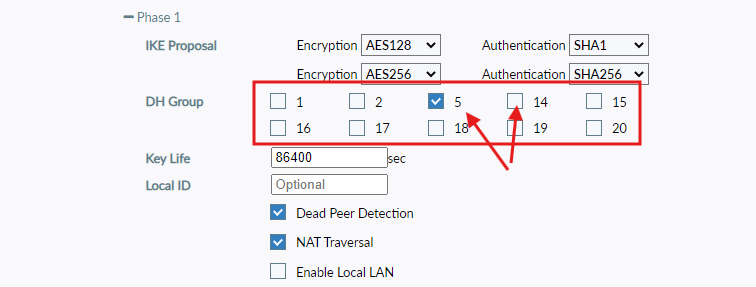
Step 2: Configure Phase 1 Settings
Under Phase 1, align the settings as follows:
- Encryption: AES128 and AES256
- Authentication: SHA1 and SHA256
- DH Group: 5 or 14
- Key Life: 86400
- Dead Peer Detection: Enabled
- NAT Traversal: Enabled
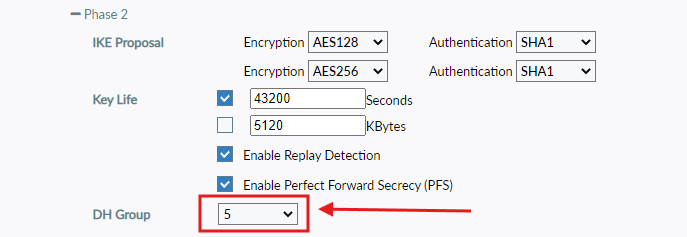
Step 3: Configure Phase 2 Settings
Under Phase 2, ensure the following:
- Encryption: AES128 and AES256
- Authentication: SHA1
- Key Life: 43200
- Enable Perfect Forward Secrecy (PFS): Checked
- DH Group: 5 or 14 (follow as Phase 1 value)
Step 4: Save the Configuration and Retry VPN Connection
After completing the Phase 1 and Phase 2 configuration steps, ensure the settings are saved properly on the FortiGate device.
- Click Save in the VPN configuration window to save all changes.
- Attempt to connect to the VPN again via FortiClient.
Conclusion
The “Timed out while connecting to” error in FortiClient VPN 7.4.x is commonly linked to mismatched or incomplete IPsec settings between client and firewall. By ensuring IKEv1 is used, configuring Aggressive Mode, and aligning Phase 1/2 encryption, authentication, and DH groups in the FortiGate GUI as shown, the VPN tunnel should establish successfully.
Administrators should verify that FortiClient settings mirror those on the FortiGate device, especially when dealing with remote users or mobile clients behind NAT.
Should you have any inquiries about the guidelines, please feel free to open a ticket through your portal account or contact us at support@ipserverone.com. We’ll be happy to assist you further.